Browsing Tag

How To

The Uncommon Life

Make Your Own Mother’s Day Card
in 6 Easy Steps

May 2, 2018

Make Your Own Mother’s Day Card in 6 Easy Steps

If you’re reading this, chances are you’ve outgrown your macaroni art years. Maybe you already picked up a great gift for mom, or maybe you’re still on the lookout for a the perfect Mother’s Day gift, but just because you aren’t sitting down to handcraft an epic gift masterpiece doesn’t mean you can’t give mom a little something handmade. Print off our free template and follow the simple instructions below for a DIY Mother’s Day card. After all, you’re never too old to whip up something she’ll be proud to hang on her fridge!

What You’ll Need

Materials

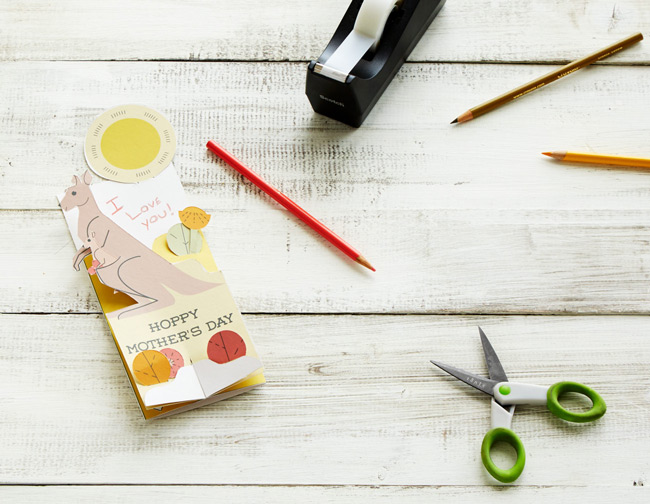
Our template (Just print this easy-to-follow template to get started. Click here to print: DIY Mother’s Day Card)
Scissors
Pen or Pencil
Tape or glue (Optional)

Continue Reading…

Design

Stefanie Wolf’s Mosaic Necklace 7 Ways

January 15, 2016

We knew that jewelry designer Stefanie Wolf’s Mosaic Necklaces are beautiful, versatile pieces, but we didn’t know that just how many ways you can wear them until yesterday, when Stefanie sent us this great video showing seven ways. (We’ll admit, it’s three more than we’d thought of, and we LOVE the new suggestions.)

Continue Reading…

The Uncommon Life

Cribs, Pegs, & Pones: How to Play Cribbage

October 9, 2015

Since the Custom Lake Art Cribbage Board first stepped on the scene last year to overwhelmingly positive reviews, UG has gotten a pretty intense case of cribbage fever. Suffice to say, there was a cribbage-sized hole in the gaming world and we answered with the Peacock Feather board, the Fern board, and new varieties that keep rolling in with each season. A quick office poll found, however, that a pitiful number of our employees actually knew how to play cribbage, and this writer was not among them.

How to Play Cribbage | UncommonGoods

In the interest of writing what you know, I figured it was high time to educate myself on the world of cribbage and now I’m here to share that information with you. Already know how to crib? What are you even doing here?! Get yourself to the nearest cribbage tournament!

Now that the cribbage enthusiasts are gone, let’s get started! The main draw of cribbage, according to my plentiful research, is that in order to win, you can rely on both strategy and good old-fashioned luck of the draw. There’s something for everybody! There can be small variations found in different regions but the overall idea is the same.

According to the one coworker I found who plays this game, writing down all the rules was a very ambitious undertaking and there is, in fact, a whole lot of nuance/random scenarios that can come up. Be that as it may, consider this a fun frolic through the basics of cribbage—a fun-dation, if you will.

The History:
The English poet Sir John Suckling created cribbage in the early 17th century as a derivative of the game “noddy.” The game also served as an official pastime on World War II submarines.

The Players:
Cribbage is best played with two people—this can be done with one on one or two on two. For the sake of this tutorial, it’ll be one on one.

The Cards:
Use a standard 52-pack of cards, King is high, Ace is low. Take out the Jokers.

The Object:
Be the first player to make your peg around the full cribbage board.

The Score:
You track your score using your new fancy cribbage board, silly! You’ll notice that there are multiple pegs. Players each use two pegs to record their score: one shows your current score, one acts as the trailing peg so that the board always shows how many points you recorded on your last score.

The Game:
Players start by drawing cards. The player with the lowest card deals first, distributing six cards facedown to his opponent (called the pone) and himself. Each player looks at their six cards and “lays away” two of them face down to reduce their hand to four. The two cards laid down from each player (making it four in total. Math!) now constitute “the crib” and belong to the dealer. However, these cards are not exposed or used until the hands have been played.

With me so far? Feel free to read it over a few times. I did.

After the crib is laid away, the pone cuts the deck. The dealer then turns up the top card at the split and places it face up on top of the deck. This card is now “the starter.”

Apparent side note to the rules that I couldn’t find an explanation for: If this starter card is a Jack, it called “His Heels” and the dealer uses the cribbage board to peg (score) two points at once. Okay, sure!

The biggest thing to know about cribbage is that for each hand there are two stages of play. The first stage is to, one by one, drop your cards in a succession that will lead to either: doubles, runs, or a sum of 15.

BACK UP.

Peacock Feather Cribbage Board | UncommonGoods

Okay. Here’s a script:
I put down a 5.
You put down a 10.
Hey, you just made 15, give yourself 2 points.

Another script:
I put down a 5.
You put down a 5.
Hey, you just made doubles, give yourself 2 points.
I put down a 5.
Hey, I just made triples, now I get 3 points.

One more script:
I put down a 5.
You put down a 6.
I put down a 7.
Hey, I made a run of 3 cards, I’ll give myself 3 points.
You put down an 8.
Hey, you just extended the run to 4 cards, give yourself 4 points.

And so on and so forth. Basically, the number of cards that make up the scorable group you make indicates the amount of points you get. Want another random number to shoot for? See if you can make your cards add up to 31 for 2 peg points. The back and forth between the two players stops once 31 is reached (and you can’t go over)—once 31 has been reached and you can’t go any further, the last person to throw down a card gets a point.

The first stage of play is over. Phew. Pick up the cards you played again and use that overturned card on top of the deck as a starter. Want another script?

The top card is a 6.
You put down a 9.
Hey, that’s 15. Give yourself a point.

The top card is a 6.
You put down a 6.
Hey, that’s a double, give yourself 2 points.

Custom Lake Cribbage Board | UncommonGoods

Sound familiar?

This stage of play isn’t a back and forth like the last one. This is you seeing what you can do with your own cards plus the overturned top card. Want to do some more? If you’re the dealer, now’s the time to take out the crib and play around with that.

Once you’re done, put all the cards back, re-deal (this time with a different dealer) and the cycle starts again and again until one of your pegs reaches the end of the board.

Full disclosure, you will probably have to read through these directions about seven times and also scour the internet for various nuances that can occur during play. I played a few hands myself and, though it took me a while to get the hang of, I can see how it would be a great way to spend a rainy Sunday with the family. Now excuse me, I’m going to go comb all the cribbage blogs and develop some strategy.

Be sure to take a look at our unconventionally stylish cribbage boards to get your game started. Happy cribbing!

See Our Cribbage Boards | UncommonGoods

Design

What to do with all these flowers!

May 16, 2013

The trees, bushes, and bulbs are all in bloom and there are flowers everywhere! So many flowers! Kind of a great problem to have. Here are some of my favorite blog posts about how to take those blooms out of the garden and incorporate them in your home decor (and wardrobe!) in truly uncommon ways.

Flowers make a lovely centerpiece, but liven up each place setting with a fresh flower tied with each napkin. Use a collection of twine, jute, and other crafty scraps like Rebecca does in her tutorial on A Daily Something. It’s amazing how those peonies, pop against those neutral napkins and plates.

Speaking of found objects, I love the look of mismatched vintage bottles and jars as bud vases. I tend to collect a lot of old glass bottles and have never considered displaying them all together, tying the collection together with a matching bud in each bottle like Elsie has done on A Beautiful Mess.

The little girl inside of me wants to lay in a field making daisy chains all day and this DIY flower crown on Project Wedding can help me accomplish wearing flowers in a chicer way. A big flower crown is a beautiful replacement for a veil on a Bohemian bride, but I want one for Saturdays. I want to walk around my neighborhood like a chorus member in Hair and proclaim myself the flower princess.

I can’t stop thinking about this handmade banner by Kelly of Studio DIY. Something about the drab cardboard background, the bright white lettering, and the pops of bright, fresh color feels so inviting (peonies!). That banner can say just about anything – Surprise!, Beinvenue, Happy Birthday. This is a craft I plan on making very soon. Seriously though, what is it about peonies that is so beautiful?!*

Another craft I want to do soon is Elsie’s floral garland on A Beautiful Mess. I love buntings and garlands in all forms – pom-poms, penants, tinsel – and this is one of the most beautiful ones I have seen on the Internets. It reminds me a lot of the popcorn garlands we made for the Christmas tree as a kid and sounds just as easy (however, I don’t know how my mom will feel about me traveling around her garden with a needle and thread). What’s even better about this garland is it will only get better with age – when the flowers dry and start changing color it will take one a completely new look.

George Harrison wisely once said “All things must pass” (actually he says it a lot of times within the course of three minutes), and so too will fresh flowers so start thinking what can be done once they begin to wilt and fade. I love this pressed flower tutorial that Esther did on Pamplemousse but if you want to know everything there is to know about pressing flowers go straight to the source – Lady Martha!

What’s a better way to preserve dead flowers than potpourri!? Store it in mason jars like in this tutorial on the Free People blog. Something about the mason jars makes it look a lot less like my grandmother’s potpourri.

Happy crafting, flower children!

Design

How to Win a Design Challenge

May 1, 2013

After facilitating 11 design challenges over the past year, I consider myself our company expert. I sit with the buyers as they sift through the entries to decide on the semifinalist designs that will make it to our community voting app, moderate the final judging session, and communicate with the designers throughout the entire process. I am to the point now where I can anticipate what the buyers will say about each entry and finalist design so I thought it would be helpful for me to share some of my observations.

Of course the final decision always comes down to the design and how well the buyers think it will sell at UncommonGoods, but keeping this advice in mind will help you avoid some road blocks that I have seen make or break the final decision.

PRICING I thought I’d start with the technical stuff to get it out of the way and because this is a really important factor in most design challenges. UncommonGoods is a retailer so we buy artist’s goods at a wholesale price. After we buy your design from you, we still need to make a profit, so we need to have a retail price set with a fair profit margin. We measure gross margin % to gauge profitability. We calculate this with (retail price – wholesale price)/retail price x 100 = GM%.

But if you have only been selling on Etsy and at flea markets, you might not have a wholesale price figured out yet. Many independent sellers are currently selling their items retail at a wholesale price! Stores like UncommonGoods will need to charge almost two times that amount to make a profit, and we won’t want to sell your design at a much higher price than a customer can get it on your site. This might mean going back to the drawing board but a strong pricing structure could really benefit you in the future.

Senior Buyer Erin Fergusson advises, “Research what is out there in the market place and understand the range of retail prices for similar products. Be sure to note the materials and how something is produced (handmade vs. manufactured) in order to understand where the cost is coming from.”

To understand pricing a little more, check out this really informative forum discussion between Etsy sellers.

Tell your product story well and completely! Some artists do a great job telling the story of their design in the Product Description field on our online submission form. Some artists don’t and it can really hurt them. This is the space to let us know all about your inspiration, your artistic process and how the design makes you feel. This is the space to tell our buyers everything you want them to know about you and your art.

If your design is chosen to be a semi-finalist, this is the copy we will edit for grammar and punctuation to use in the community voting stage-so this story won’t just attract our buyers, but also the thousands of voters who will be viewing your design. Good product copy can make or break your chances with the voting community, the buyers, and the rest of the judging panel.

Our buyers love collections. When I sit with a buyer and go through design challenge submission, more often than not we are also visiting an artist’s website to see what else they have. Not because we’re nosy, and not because we don’t like what we see. Our buyers want a sense of an artist’s future as a vendor at UncommonGoods. They’re looking for an artist that will be able to create a collection of similar products. Check out Valerie Galloway and Etta Kostick – former design challenge participants with robust collections.

Be prepared for our inventory demands. Our inventory requests for each design are always different depending on price and category, and our buyers work to create a plan with each designer that is beneficial to both parties. One common question you should be able to answer is “how many of these can you make in a week’s time?” Don’t know the answer to that question because you’ve only ever made one? That’s ok too, but have a plan in place for scaling up. (Get some advice from our current vendors here!)

Send a product sample, NOT a prototype. Most challenges require the semifinalists to send in their design for the buyers to review. Even if a design doesn’t make it into the top five designs that are judged, the buyers will review all the samples that come in. So many other artists are eager to get their designs into our buyers’ hands-but so many times I see samples with unfinished edges and chipping paint. Who knows when you will get another chance.

Send them something that shows the true extent of your talent. Before you send out your sample think, is this something I would send to a paying customer? Remember, when our buyers have your design in their hands they are thinking the exact same thing.

Stay tuned to our Twitter to learn about new design challenges and enter our Art Contest all year round!

Gift Guides

How to Repair a Wool Sweater

February 22, 2013

Getting the opportunity to try uncommon products is one of the great things about working at UncommonGoods. While many of these product-testing experiments become gift labs, every now and then we find a new good with so many uses we can’t fit them all in one “report.” The Woolfiller Sweater Mending Kit is an example of just such a product, AND, since associate buyer Katie and community moderator Cassie both had their eyes on this winter must-have, we decided to diverge from the traditional gift lab format and see just how many uses we could come up with for this clever kit. Four are outlined below, but Cassie and Katie agree that the fun doesn’t have to stop there!

Katie: Having spotted the Woolfiller at a major New York trade show last year, I was anxious to get such a solution-oriented product into our assortment. A fun, hands-on kit to patch up an old favorite or add some flair to a basic sweater seemed like the perfect DIY project nearly anyone could adopt.To put this product to the test, I decided to tackle two specific projects, the first was to patch the embarrassingly large (and winter chill-inviting) elbow holes on one of my favorite sweaters. After completing the elbow hole patches, I wanted more – I had seen some fun images the company provided where people used the bright colored wool to add some creative patches as flair and I wanted to try this out, which lead to Project two: adding flair.

Cassie and I decided to each purchase one kit – a match made in heaven as this green-adoring girl, could partner with Cassie’s purple-loving self and combine to make a cornucopia of rich, jewel-tone wools mixed with solid staple colors (greys, blacks, beiges) which came in extra handy for my second project. But I would also say that one kit is entirely sufficient – each comes with bright color options as well as neutral, basic colors which should cover a range of sweater needs. And to that point, upon unloading our kits onto a communal table, we were both surprised by how much wool comes in each kit – we went about tearing each ball into half and divvying up our goods.

Project 1: Bold Elbow Patches

Katie: After some deliberation, I chose to patch the elbows of my dark, gray sweater with the natural beige wool – aiming for a contrast patch look – like your grandfather’s sweater.

After choosing the color of wool, I reviewed the simple instructions and went to work. I used a pair of scissors to make the first of my ragged elbow holes into a smooth, even oval to ensure my patches would be as clean-looking as possible. Next, I ripped a decent amount (maybe the width of a lime) of wool off the main piece, turned my sweater inside out, put the provided foam piece in the sleeve, laid the wool over the hole, and began poking!

After completing the first of two patches, I turned my sleeve right-side out to inspect my work. Herein I learned one of the bigger lessons of the project – while the instructions suggest turning your piece inside-out to use the product, I found that by doing that I was less aware of the exact line of the hole (because the piece of wool covered it) and as a result I ended up with what can only be described as a “halo” effect around the patch – one sold patch, with a light ring of excess wool surrounding it.

On elbow #2 I decided to try another approach – again I cut away the ragged edge to make a smooth hole, but this time I left the sweater sleeve right-side out, I inserted the felt piece, and lined the wool up perfectly with the hole and started poking away. I found when I did it this way, I was able to guide the wool into a perfect oval while poking and overall felt much more in control of the overall work. When complete, the patch appeared much more perfect and solid.

After completing the elbow patches, I moved onto my next experiment…

Project 2: Adding a Little Flair

Katie: I decided to do a simple trio of mini circles with bright colors. Having learned from my elbow patches, I left my sweater right-side out, tore of tiny circles of wool (about the size of a quarter), and started poking away! I found my technique was much-improved, I used my fingers to expertly guide the wool and before I knew it I had my little flair added in.

In the interest of science, here are my key Findings:

Finding #1:
This kit comes with a lot of wool. I was surprised by how little wool it took to patch up my rather large elbow holes. I have a lot of wool leftover and am just waiting for a quiet Sunday to get to patchin’ my slew of other well-worn sweaters.

Finding #2:
The more you poke – the more “felted” the wool becomes. Good thing poking is super fun.

Finding #3:
As mentioned above, the kit recommends turning the piece inside-out and then using the wool filler, however, I found this created a slight ‘halo effect’ around the actual patch, and when I tested using the kit the opposite way – with the sweater turned right-side out, I was very pleased with the results – I could control the pokes more and create a clean oval with no halo.

Finding #4:
The Woolfiller is a really easy, creative way to patch.

Having now completed two projects on one beloved, well-worn sweater, I can vouch for the usability and honestly–the fun– this product provided.I passed the DIY-sweater-patch torch along to Cassie.

Project 3: The No-Show Repair

Cassie: I also had a beloved sweater with a hole in it. Unlike Katie, I didn’t want my repair job to be super noticeable. My hole was just under the arm of a multi-colored sweater, so I hoped I could blend the new wool in and make the sweater look like new. Taking her findings into consideration, I began my exercise in craftology.

I started out the same way, by finding the hole, turning the sweater inside out, and inserting the foam block. Then I picked out a couple of colors that I thought would mix nicely with my sweater’s pattern.

I placed the wool over the holes and started poking. It was really fun, and, because the sweater is 100% wool the new wool took almost instantly. I pricked at the wool with the felting needle for less than a minute before the patch was completely attached, but I kept at it for a little longer, just to make sure it was blended well.

I turned the sweater back inside in and gave it a few more pokes, just to give the wool a smoother look. The finished product looked good, and the patch feels just like the rest of the sweater.

While I agree with most of Katie’s key findings, I found that starting with the sweater inside out worked great for a small, blended patch. She preferred the look of the patch when she placed the wool directly over the hole without turning her garment inside out first. I’d recommend doing a test on your own piece, by woolfilling just a small section of the patch, before completing your own project.

Project 4: Super Star Style

Cassie: Giving my sweater a quick fix was fun and easy, but after seeing Katie’s bold patches and the little bundle of flair she added to her project, I was a little jealous. I wanted to give my own colorful creation a try, so I decided to add a little shape to an old cardigan.

First I drew a star shape on a small piece of scratch paper. Then, I cut out the star, leaving an outline. Next, I placed the outline over the elbow of my sweater. (Remember to insert the foam block first.)

I didn’t turn the sweater inside out this time, since I wasn’t actually making a real “patch,” I was just covering up the existing material with new wool.

I put a little ball of bright pink wool in the center of the star shape, then started stretching it out to fill the cutout as I poked it with the felting needle. I didn’t secure the star before starting this process, which made it a little trickier than it had to be. Next time I’ll hold it in place with some fabric tape or a safety pin.

I gradually added more wool and pulled it into the shape of the star as I worked at it with the felting needle. Once I had the outline filled in I removed the paper and then poked carefully around the outside edges of the star to give it a sharper shape.

Since the cardigan isn’t entirely wool (it’s a blend also containing nylon and cotton), it took a lot longer for the woolfiller to adhere this time than it did with the 100% wool sweater I’d used it on before.

The star turned out well, but there was one problem. I was so focused on creating my shape that I forgot to move my foam block the whole time I was poking. The wool (and the sweater) got stuck to the block, so It was somewhat difficult to remove when I was done. Make sure to readjust the block several times during your project to make sure this doesn’t happen!

I’ll definitely try this again next time I want to give an old sweater a new look. Next time, I might try a heart, a triangle or square, or maybe even a letter.


Through our multiple sweater patching projects, we learned that the Woolfiller Sweater Mending Kit is a great way to repair a damaged sweater, give old wool a new look, or add a personal touch to your favorite pieces.

And, bonus, it’s not just for sweaters. It works on any pretty much anything made of wool!

The Uncommon Life

A Rockin’ Sinangag (Filipino Garlic Rice) Recipe

August 31, 2012

I had a bunch of leftover cooked jasmine rice in the fridge and a new UncommonGoods gadget I wanted to try, the Garlic Rocker. So I did the math and came up with Garlic + Rice = Garlic Rice. Clever, eh?
Googling “garlic rice” in search of a recipe led me to the discovery that in the Phillippines, it’s a breakfast staple called “sinangag” in Tagalog. Garlic for breakfast?! I was on it like white on rice.
Because fried rice doesn’t require exact measurements–you can judge just by looking how much of each ingredient you want to add to it–I looked at several recipes and more or less winged it from there. (The recipe links are at the bottom of this page.) I also consulted UncommonGoods’ two Filipino software developers, Albert Tingson and Orlando Geronimo.
Orlando (right, in photo) said, “How about if you bring the sinangag to work and we’ll have a good breakfast with some tapa and fried egg. We call it ‘Tapsilog.'” All three of us were enthused about this idea until we remembered that we have no way to cook fried eggs at work.
With any kind of fried rice, you want to get all the elements (except herbs, if you’re using them) cooked and chopped before the “frying” begins (actually, sautéeing in my case, as I used a flat pan instead of a wok).
I put some “fancy” generic store brand frozen peas in a bowl and defrosted/cooked them in the microwave. When they were done, I set them aside.I started scrambling a couple of eggs. The secret to good scrambled eggs is low heat, minimal scrambling, and removing the eggs when they’re still slightly underdone, because they’ll cook a little more from their internal heat. That way, the eggs turn out soft and delicious rather than rubbery and tasteless.
When the eggs were done, I sort of stab/chopped them into irregular, bite-size chunks with the plastic spatula I was using in the non-stick pan. Then I set them aside.I took my leftover rice out of the fridge and broke up the stuck-together hunks so that it’d be ready to be scattered into the pan when the time came. I set that aside, too.Then I cut each garlic clove in half lengthwise so that it would lay flat and stable.Now I was ready to ROCK. I pressed the rocker down onto a nice, fat garlic clove and rocked it back and forth to cut through the whole clove.Oh, how beautiful the results were. Perfect little bullets of garlic that resembled part of a honeycomb. Without bothering to scrape off the “bullets,” I put another couple of cloves underneath the tool and pressed/rocked them, too.Because I’m a garlic glutton, I rocked a few more cloves. Then it was time to sauté the garlic bullets.
I used peanut oil. Chinese cooks normally use it because it has a high “smoke point” – meaning it can get a lot hotter than, say, canola oil, corn oil, or butter, before it starts smoking and burning. Also, its flavor goes better with Asian food than olive oil’s does. (If you live near an Asian grocery, buy it there. It’s a lot more expensive at typical American groceries.)I put maybe three tablespoons more into the pan than I needed for sautéeing the garlic, so that there’d be plenty of gloriously garlicky oil left over to fry the rice with.
I’m an impatient cook and I hate to watch over things, which is why I very often overcook my hamburgers and burn my garlic. Burning garlic ruins it. It tastes really acrid and bad. So I made myself pay attention and kept the heat low-ish. I didn’t ruin it! OK, actually a few pieces were overcooked, but I deleted them.One of the recipes I’d found said to add the rice to the garlic in the pan, but I didn’t want to risk cooking the garlic any longer. Instead, I set it aside with the other prepped ingredients, leaving as much as possible of the now-flavored oil in the pan.
It was time to put together the sinangag. I raised the heat to high and added the rice, stirring it in order to make sure it all got some oil on it. I cooked it for maybe three minutes, not enough to brown it, but sufficient to get it hot and give it some of the character of the hot oil. You can smell when it’s right — it’ll remind you a little bit of popcorn cooking in oil.
I added the peas and eggs and stirred to more or less evenly distribute them in the rice and to get all three elements to flavor-kiss a bit. Then I turned off the heat, added the garlic, and stirred some more. A wave of garlic bliss came over me while putting so much into what was only a couple of servings of rice.And there you have it. In imitation of the photo accompanying one of the recipes I’d found, I pressed it into a little bowl-type thingy (I don’t know what to call it because it isn’t round like a bowl — mini-crock?) and made it look all nice and photogenic.
I served some of it into a bowl that I know is an actual bowl because it’s rounded, added a couple of dashes of soy sauce, and dug in. It was a beautiful, heavenly, garlic symphony, much more than the sum of its humble parts.

Recipe: Sinangag (Filipino Garlic Rice)

Ingredients
(I’m not giving amounts because it’s up to you and how much leftover rice you have.)

Leftover cooked rice (it should be at least one day old)
Frozen green peas
Eggs
Garlic cloves (lots)
Peanut oil
Salt or soy sauce

Preparation steps
1. Break up the rice if it’s sticking together; set aside.
2. Defrost and cook the peas. Set them aside.
3. Gently scramble the eggs; then break them up into small pieces. Set them aside.
4. Peel and cube (or “rock” – but do not use garlic press) the garlic into quarter-inch-size chunks and saute until golden–not dark–brown.
5. Set frying pan or wok on a burner and set heat to high.
6. As soon as oil has a subtle, shimmery sheen (but before it smokes), add rice and cook for about 3 minutes, until the rice is hot and perhaps very slightly browned in a few places, but no more. Turn heat down to medium.
7. Add the peas and eggs and stir to mix; cook for about a minute.
8. Turn off heat; add garlic and stir.
9. Add salt or soy sauce to taste.

Recipe links
Sinangag – Filipino Garlic Fried Rice
Garlic Fried Rice
Sinangag – Eggs and Peas Fried Rice
How to cook fried rice (Sinangag na Kanin)

Design

Tips for Creating a Winning Portfolio by Design Challenge Champ Tasha McKelvey

August 14, 2012

A great portfolio is a must-have in the visual world of design, but what’s the best way to build an eye-catching image collection? Ceramicist Tasha McKelvey captured our judges’ attention and won our first Ceramics Design Challenge with her uncommon piece. Here’s her advice on creating content to get the attention of art show judges, buyers like ours, and others in the art world.

Last fall I entered the UncommonGoods Ceramics Design Challenge on a whim. The holiday rush was already upon me, so I decided to take a few minutes and fill out the application right then. Otherwise, I knew I would end up forgetting and not enter at all.

Be Prepared

I already had an item to enter in mind. My Birdie Mini Dish would be a good fit for a catalog based on the size, price-point, cuteness factor, functionality and my studio’s ability to produce it both efficiently and in quantity.

Using relatively few images and words, I would need to effectively communicate all these details to the judges reviewing the applications for the Design Challenge.

With my entry decided on, I was able to pull my application together very quickly because I had already invested some time and thought into the process of portfolio presentation. The images I submitted for judging reflected the function, size and other options I offered for the mini-dish while still demonstrating the items’ consistent style.

This was the most specific mini-portfolio I have put together to date because it really only contains one piece of my work. I normally present a quite different group of images to craft show juries or gallery owners emphasizing the full scope of my work along with my particular style or voice.

Be Selective

Some time ago I created a Flickr portfolio of product images I had assembled for some indie craft show applications. I wanted to provide the show’s jury panel a link to a small selection of images I felt accurately represented my current ceramic work. Just sending a link to my website might have been overwhelming for a jury since it catalogs the entire diversity of my work. The smaller online portfolio I created on Flickr can also be a great resource to share with galleries, shop buyers, and the press.

Create a Cohesive Look

Additionally, the images are appropriate for uploading directly to an online craft show application that require image attachments for jurying. The individual images in my portfolio are actually composites; each jpeg consists of two images side by side. I combined the images using Photoshop, but there are lots of other programs available that can do the same thing. In order to better demonstrate the variety and relationships in my work, I chose to use two images in each “slide”. I put my bird bowls side by side with my ceramic bird necklaces, my ginkgo pottery with my ginkgo jewelry, my woodland gnome with my woodland mushroom mini-tray, etc.

Photos by Tasha McKelvey

Tell a Story

Take a look at the six “slides” that make up my portfolio. Notice the order I placed them in and the story such an arrangement tells. The first image is bold and eye-catching, while the last image references the subject matter as well as some of the colors in the first image (a little trick I also used with my UncommonGoods Design Challenge images too). Even though the backgrounds vary, each image shares the common themes of neutral colors and woodgrain — there is variety, but it is a consistent variety.

Know Your Audience

I use these images for indie craft shows and boutiques, but I do not always use these particular images for more traditional or upscale art and craft shows or galleries. For most non-indie shows I have a separate set of images with a gradient gray background. More traditional or high-end show juries have certain expectations for image presentation, and my casual woodgrain backgrounds might rub some of the more traditional art show jury members the wrong way. Also note that composite images are not recommended for non-indie shows in general.

Here are some examples of my images for non-indie art and craft shows.

Photos by Tasha McKelvey
The UncommonGoods buying team is always looking for great new designs. Check out our latest design challenge or show us your work through our new goods submission form.