Browsing Tag

Kitchen

The Uncommon Life

Cooking Local Pinterest Contest

September 21, 2012

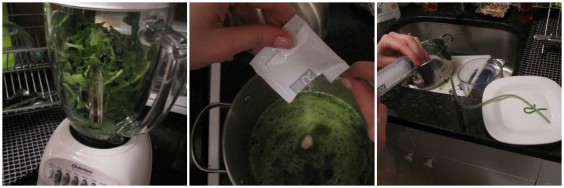
Do you look to your favorite pinner when it’s time to make dinner? Are you always hungry to share your love for your city or state? Then our latest Pinterest contest is for you. We’re combining fabulous food and hometown pride in the UncommonGoods Cooking Local Contest.

Cook up your best board and leave a link and an email address in the comments below and/or on the original pin in our Cooking Local board and you’ll be entered to win an UncommonGoods prize package featuring designs from CatStudio.

The package includes a Hand-embroidered Pillow, a Geography Apron, and a Geography Towel. We’ll announce the winner on Friday, October 5 on our blog.

Follow us on Pinterest for more updates. Good luck and happy pinning!


Entries must be received by midnight on Thursday, October 4.

Open to US citizens only.

The Uncommon Life

A Rockin’ Sinangag (Filipino Garlic Rice) Recipe

August 31, 2012

I had a bunch of leftover cooked jasmine rice in the fridge and a new UncommonGoods gadget I wanted to try, the Garlic Rocker. So I did the math and came up with Garlic + Rice = Garlic Rice. Clever, eh?
Googling “garlic rice” in search of a recipe led me to the discovery that in the Phillippines, it’s a breakfast staple called “sinangag” in Tagalog. Garlic for breakfast?! I was on it like white on rice.
Because fried rice doesn’t require exact measurements–you can judge just by looking how much of each ingredient you want to add to it–I looked at several recipes and more or less winged it from there. (The recipe links are at the bottom of this page.) I also consulted UncommonGoods’ two Filipino software developers, Albert Tingson and Orlando Geronimo.
Orlando (right, in photo) said, “How about if you bring the sinangag to work and we’ll have a good breakfast with some tapa and fried egg. We call it ‘Tapsilog.'” All three of us were enthused about this idea until we remembered that we have no way to cook fried eggs at work.
With any kind of fried rice, you want to get all the elements (except herbs, if you’re using them) cooked and chopped before the “frying” begins (actually, sautéeing in my case, as I used a flat pan instead of a wok).
I put some “fancy” generic store brand frozen peas in a bowl and defrosted/cooked them in the microwave. When they were done, I set them aside.I started scrambling a couple of eggs. The secret to good scrambled eggs is low heat, minimal scrambling, and removing the eggs when they’re still slightly underdone, because they’ll cook a little more from their internal heat. That way, the eggs turn out soft and delicious rather than rubbery and tasteless.
When the eggs were done, I sort of stab/chopped them into irregular, bite-size chunks with the plastic spatula I was using in the non-stick pan. Then I set them aside.I took my leftover rice out of the fridge and broke up the stuck-together hunks so that it’d be ready to be scattered into the pan when the time came. I set that aside, too.Then I cut each garlic clove in half lengthwise so that it would lay flat and stable.Now I was ready to ROCK. I pressed the rocker down onto a nice, fat garlic clove and rocked it back and forth to cut through the whole clove.Oh, how beautiful the results were. Perfect little bullets of garlic that resembled part of a honeycomb. Without bothering to scrape off the “bullets,” I put another couple of cloves underneath the tool and pressed/rocked them, too.Because I’m a garlic glutton, I rocked a few more cloves. Then it was time to sauté the garlic bullets.
I used peanut oil. Chinese cooks normally use it because it has a high “smoke point” – meaning it can get a lot hotter than, say, canola oil, corn oil, or butter, before it starts smoking and burning. Also, its flavor goes better with Asian food than olive oil’s does. (If you live near an Asian grocery, buy it there. It’s a lot more expensive at typical American groceries.)I put maybe three tablespoons more into the pan than I needed for sautéeing the garlic, so that there’d be plenty of gloriously garlicky oil left over to fry the rice with.
I’m an impatient cook and I hate to watch over things, which is why I very often overcook my hamburgers and burn my garlic. Burning garlic ruins it. It tastes really acrid and bad. So I made myself pay attention and kept the heat low-ish. I didn’t ruin it! OK, actually a few pieces were overcooked, but I deleted them.One of the recipes I’d found said to add the rice to the garlic in the pan, but I didn’t want to risk cooking the garlic any longer. Instead, I set it aside with the other prepped ingredients, leaving as much as possible of the now-flavored oil in the pan.
It was time to put together the sinangag. I raised the heat to high and added the rice, stirring it in order to make sure it all got some oil on it. I cooked it for maybe three minutes, not enough to brown it, but sufficient to get it hot and give it some of the character of the hot oil. You can smell when it’s right — it’ll remind you a little bit of popcorn cooking in oil.
I added the peas and eggs and stirred to more or less evenly distribute them in the rice and to get all three elements to flavor-kiss a bit. Then I turned off the heat, added the garlic, and stirred some more. A wave of garlic bliss came over me while putting so much into what was only a couple of servings of rice.And there you have it. In imitation of the photo accompanying one of the recipes I’d found, I pressed it into a little bowl-type thingy (I don’t know what to call it because it isn’t round like a bowl — mini-crock?) and made it look all nice and photogenic.
I served some of it into a bowl that I know is an actual bowl because it’s rounded, added a couple of dashes of soy sauce, and dug in. It was a beautiful, heavenly, garlic symphony, much more than the sum of its humble parts.

Recipe: Sinangag (Filipino Garlic Rice)

Ingredients
(I’m not giving amounts because it’s up to you and how much leftover rice you have.)

Leftover cooked rice (it should be at least one day old)
Frozen green peas
Eggs
Garlic cloves (lots)
Peanut oil
Salt or soy sauce

Preparation steps
1. Break up the rice if it’s sticking together; set aside.
2. Defrost and cook the peas. Set them aside.
3. Gently scramble the eggs; then break them up into small pieces. Set them aside.
4. Peel and cube (or “rock” – but do not use garlic press) the garlic into quarter-inch-size chunks and saute until golden–not dark–brown.
5. Set frying pan or wok on a burner and set heat to high.
6. As soon as oil has a subtle, shimmery sheen (but before it smokes), add rice and cook for about 3 minutes, until the rice is hot and perhaps very slightly browned in a few places, but no more. Turn heat down to medium.
7. Add the peas and eggs and stir to mix; cook for about a minute.
8. Turn off heat; add garlic and stir.
9. Add salt or soy sauce to taste.

Recipe links
Sinangag – Filipino Garlic Fried Rice
Garlic Fried Rice
Sinangag – Eggs and Peas Fried Rice
How to cook fried rice (Sinangag na Kanin)

The Uncommon Life

Gift Lab: Fresh Air Compost Collector

July 5, 2012

Background Research

The Fresh Air Compost Collector, designed by Heather Tomasetti and Tal Chitayat, is a smart-looking, new-fangled container for storing your compostable food scraps.

Image: Royal Caledonian Horticultural Society

First, for those of you who don’t already participate in the wonderful world of composting: what is it, and why should you do it? In a nutshell (ha-ha, see what I did there?), composting is piling up a lot of waste plant matter–fruit and vegetable peelings, moldy bread, browned avocadoes, raked leaves–in a specific way that makes them decompose in the same manner, but at a faster rate, than they naturally would on their own.

Compost Heap, a 39 Day Time-lapse

Not only does this divert them from the general waste stream and thus the landfill, but “finished” (thoroughly broken-down) compost works magic on plants, not only in an eco-positive way, but also in terms of complex plant science. I tried it, and my plants shot up like they were on steroids.

You’ve probably heard of people keeping worms in bins in their homes in order to compost. But you don’t have to do that. You can just save your scraps and bring them to a compost site run by your community, or a neighbor. However, there’s no getting around the fact that saving compost scraps means keeping them at room temperature for at least a few days if not longer, which can have its unpleasant aspects. The purpose of the Fresh Air Compost Collector is to make them less so.

Time-lapse Fruit and Vegetable Decomposition

See? It’s not necessarily gross. It’s natural, and fascinating to your inner biology nerd.

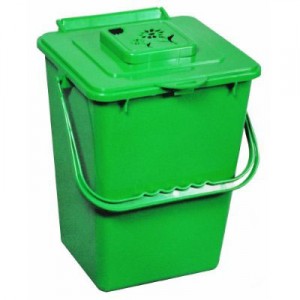
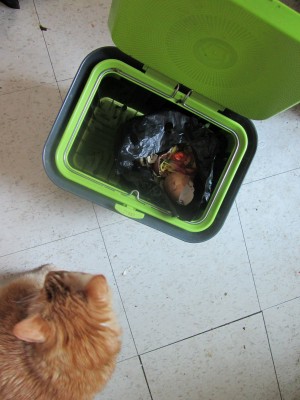
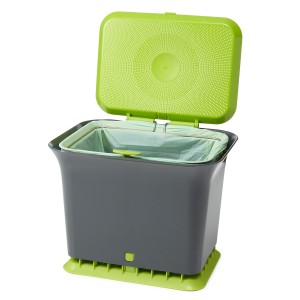
Most indoor compost collectors either have a lid to prevent odors from escaping, or, like the one I used to have, above, use charcoal filters or other devices to absorb them. (Admittedly, the ventilation-promoting, filter-holding, cut-out flowers on the lid are nicely done.)

The Fresh Air Compost Collector, on the other hand, is designed to allow air to circulate around the scraps in order to slow down the rot rate. (The inventors refer to “air flumes,” and there are no such things, but calling them that is kind of adorable on their part.) Oxygen can get in and heat and moisture can get out, so your moist, vegetably, fruity leftovers evaporate a bit, preventing “anaerobic” (oxygen-free) breakdown. That’s what causes quick bacteria and mold growth, evil-smelling slime, and the fruit flies it attracts.

Hypothesis

The Fresh Air Compost Collector will allow me to enjoy composting, relatively undefiled by disgusting smells and unwelcome fruit flies.

Experiment

I got my Fresh Air Compost Collector in January and have been using it ever since. To be honest, I didn’t expect it to work all that well, because I usually believe in the tried, true, and un-chic, and this is pretty stylin’ for a waste receptacle.

I was game to try, though, because it was a pain to deal with my old compost pail. With that one, I was never sure if I was supposed to put a bag inside it to collect the scraps, or drop them directly into the naked pail.

If I just put them in the pail, it would soon absorb their collective noxious stink. But plastic bags would never stay upright enough to catch the scraps when I dumped them in (which almost invariably happened when I was cooking and unwilling to stop, open the pail, and hold up the stinky, slimy bag to get the scraps in while somehow keeping it upright so as to not spill its contents). Paper bags disintegrated when wet. And when I pulled the bags out to bring it to the compost pile, they always dripped putrid, decomposing produce juice on me, either then, or on the way there, or when I dumped their contents into the community container.

So, on to the new one: First of all, the design of this container is deceptively simple. You can’t really perceive this until you use it, but it’s very well thought-out in every detail.

The sides and bottom of the container have ribs that stick out and keep the bag from lying flat against them. Any liquid that might drip evaporates instead of pooling and festering.


Image: Picker's Treasures

The spring-loaded lid, which is full of tiny holes that allow air to circulate but keep out the flies (just like the tin panels of an old-fashioned pie safe), pops open when you press the button, and stays open without having to be held.

A detachable metal frame keeps the bag upright, so you can toss your scraps into it without getting glop all over yourself. The frame is strong, but light and very easy to lift off and click back into place when you put in a new bag.

One ergonomically crucial factor for me is that, because of where it needs to be stowed in my kitchen, it has to fit under my all-the-way-open dishwasher door, and at 9” tall (and 11.4″ long by 8.5″ wide), it does.

Whether its 1.3-gallon capacity is a good size for you or not depends on how often you eat fresh fruit and vegetables, and how often you’re able to drop off your saved scraps at a compost pile. The one I go to, the North Brooklyn Compost Project, is only open Saturday mornings, so I have to keep my scraps for up to a week (or longer, if I miss the day–see below).

There have been weeks when it was too small for me (I joined a food coop, got overly ambitious, bought too many vegetables, then got busy with other things and most of them went bad in my fridge).

There have been other times when it was too big (my cat died suddenly, I wasn’t up to cooking for a long time, didn’t bother to grocery shop, and put only coffee grounds and the occasional squozed-out lemon in there).

Aaaaand there have been weeks when I missed the compost drop-off day. By “weeks,” I mean “three weeks in a row.” (In my defense, this happened in the middle of winter.) Then it started to smell, though it never got as bad as my old one did.

But those aren’t fair testing conditions; no composter could deliver fume-free service under such circumstances. In general, the Fresh Air Compost Collector performed as promised: it emitted way fewer smells than my old composting pail, and the only time fruit flies were appeared were that one time when I pushed the limits of biology way too far. Even then, I saw only the beginnings of mold.


You’re meant to use compostable liner bags with the Fresh Air Compost Collector, because unlike plastic ones, they “breathe.” Since the bags start biodegrading as soon as you put moist food in them, I was sure they’d break in the container, or on the way to the compost pile. As a precaution–because I don’t like coffee grounds mixed with fermented mango skin and slimy rotten cucumber bits dripping down my legs–I put the bag into a plastic shopping bag for the walk to the compost pile. But it was never actually necessary, even after three weeks. None of the bags has broken yet. Still, I recommend holding the bottom of the bag in such a way that it won’t tear when you pick it up. The speed with which they (and everything in them) break down increases as the temperature gets warmer.

The container can easily be taken apart and put in the dishwasher, though the one time I needed to wash mine (following the three-week-no-compost-pile era), I did it by hand.

Tip: Don’t buy the wrong type/size of bags like I did once, duh. Doggie bags! Rusty Marmalade (RIP) was so disappointed in me.

Conclusion

I’m impressed with this doohickey. The Compost-Scrap-Saving Experience no longer means mess, stink and flies. As all three of those are greatly disliked by humans, no wonder the Fresh Air Compost Collector won a 2012 Green House Design Award. Six months in, I’m still happy with it, and am looking forward to filling it with the remains of this summer’s delicious fruits and vegetables.

Gift Guides

Gift Lab: Molecular Gastronomy Dinner Party

June 21, 2012

Background Research
Wikipedia says that “Molecular gastronomy is a subdiscipline of food science that seeks to investigate, explain and make practical use of the physical and chemical transformations of ingredients that occur while cooking, as well as the social, artistic and technical components of culinary and gastronomic phenomena in general.”

Huh?

I have heard of this food science. I have heard of different restaurants in metropolitan areas around the world, maybe even in not-so-metropolitan areas. I have seen it done on one of those cooking shows. Many friends have gone to wd-50 in NYC and said it was interesting. My friend Stephanie had a 12 course meal of different foods reconstructed at a resort in Mexico. The pictures were awesome. I mean a lemon meringue pie that looks like a SOS Sponge awesome!

Walking at the NY Trade Show I see some fun pictures of crazy foods and then a kit. I can do this at home? Yes please! I couldn’t wait to try out this new product.

Hypothesis
I will be the new Wylie Dufresne, with the help of some friends, and make a meal that will impress the masses. This will all be accomplished in 1 night without a culinary class and with little cooking skills. My most impressive meal is chicken and rice.

Experiment
Materials Needed:
1 Molecular Gastronomy Kit with all its contents
Blender
Roomy Fridge and Freezer
Hand Blender
Lots of Bowls
Stove
Lots of Pots
Friends
Wine (just in case it all goes wrong)
Ingredients for all recipes (frozen chocolate wind, arugula spaghetti, balsamic vinegar pearls, goat cheese raviolis, raspberry raviolis).
Extra ingredients to pair with the yummy food
TV
DVD player
Timer
Scale if you want to be exact

Step 1: I watched the DVD to pick the recipes I wanted to cook and get all the instructions.

Step 2: I Gathered friends and all materials.

Step 3: Watch DVD of all recipes with friends and decide what recipe has the longest cooling time and do that one first. (FYI: Chocolate wind had to cool down in the fridge and then sit in the freezer for about an hour.)

Step 4: Start cooking/ being a scientist.

Goat Cheese Raviolis

Chocolate Frozen Wind

Arugula Spaghetti

Balsamic Vinegar Pearls

Step 5: Make everything look pretty for the cameras.

Goat Cheese Raviolis with tomatoes and basil / Arugula Spaghetti and Balsamic Vinegar Pearls with Tomato / Frozen Chocolate Wind with Raspberry Raviolis

Step 6: Enjoy!

Thanks for your help Nate and Stefanie and Morgan and Sorayah!

Conclusion
The kit has very thorough instructions that walk you through each step by showing you and some great music to keep cooks dancing. It makes the process easy and super fun! And the balsamic pearls and arugula spaghetti looked the best! But maybe I need some more snacks when things are cooling in case guests have not had a snack before the party. I think I just need one more party and a little less wine, and I can open my own restaurant! So fun!

Gift Guides

Finding the Perfect Wedding Gift for a Special Couple

June 8, 2012

Someone very important to me is getting married. Weddings are a big deal, and I’m thrilled, but I’m also a bit overwhelmed. Why am I overwhelmed when it isn’t my wedding? Because I’m now tasked with finding the PERFECT wedding gift.

Finding that gift that says it all shouldn’t be that hard, right? After all, I have known the guy his whole life. So before I get into the details of my quest to find that best-wedding-gift-ever gift, here’s a little background info.

Beau (soon-to-be groom), Cassie (me), and Luke (baby brother) sometime in the late ’80s

When I was almost 3 years old, my life changed–big time. I went from being an only child to the proud owner of my very own little brother. Luckily, since I’d only been on the planet a few short years, I hadn’t gotten too used too cozy in that only child role.

Growing up with a brother not much younger than me was great. We went to the same school, share friends, have similar interests, and–on account of the whole same parents thing–can really relate to each other. Somewhere along the way, we even got another little bro to share.

Fast-forward 20-something years. Now I have a husband my own and my brother, Beau, has a smart, charismatic, funny fiance. This wedding gift has to show Beau how much I care, that I’m happy for him, and that I can’t wait for Bobbi to be a part of our family.

Beau and Bobbi

First I made a list of things they like, in hopes of getting gifting inspiration. They both love fishing (they’re actually having a fishing-themed wedding) and other outdoor sports. They also both love cooking. Beau loves history and archaeology and he works for the railroad. Bobbi works in financial management and she loves crafting and DIY projects.

Vases for the candy buffet (fill with Swedish Fish, gummy worms, and Goldfish crackers) / Inspiration for the theme / Card basket and photo for the gift table/ Cattails for the centerpieces. Photos by Bobbi Dahnke

Starting with their professions, I thought Beau might like the Railroad Date Nail Cufflinks, and I could pair them with a necklace for Bobbi, like the Cymbal of Love Pendant or the Links of Love necklace.
Next, there’s Bobbi’s specialty. I could just give them a wad of cash with a nice card and a joke about how she’s in charge of the money. But, on second thought, while they might enjoy the dough, it’s probably not right for this special occasion.They do both like cooking, so something like the Artisanal Bamboo Salt Chest, an Elevate Carousel Utensil Set, or a Recipe Box and Card Kit, while not extremely personal, would be much-used by my brother and sister-in-law.

If I really wanted to focus on “personal” I could make them something myself. I would love to put together a scrapbook, create a quilt (if I knew how to quilt, of course), or paint their portrait (again with the “if I could do that sort of thing” thing). Unfortunately, me creating a beautiful handmade gift probably isn’t going to happen.

The next best thing is finding a lovely handmade gift handmade by someone else, but expressing what I want to say. Something that really says, “Welcome to the family.” A Wedding Wishes Vase is a great choice, because it’s a way for me to share how I feel about the happy couple and let others do the same. I also love the Personalized Tree Anniversary Plate and the tree fits nicely with their outdoorsy wedding theme. Another of my custom favorites is the Personalized Photo Wall Art. Since she’s choosing to change her last name, it would be a fun way to say “Now you’re a part of team Tweten.”

So, which of these wonderful gifts did I decide is perfect for my brother and his beautiful bride-to-be? I can’t say, because the wedding hasn’t happened yet (and because, to be honest, there’s a wee possibility that I haven’t decided). All stressing aside, though, I know they will love the gift no matter which product I choose, because it’s coming from me. (Not in a weird “I’m so great they’ll love anything I pick” way, but in the way that you hang indecipherable drawings from children on the fridge because they were made with love.)

I’m looking forward to celebrating their special day with them, wearing a fancy bridesmaid’s dress, and–like I watched my little brother grow up–watching two people in love grow old together.

The Uncommon Life

How to Style Tea Towels in Two Rooms

May 29, 2012

I live in a very old building in Brooklyn. My apartment definitely needs a little work, so I’m always on the lookout for fun ways to dress the place up. After hearing about a few ways to take tea tea towels above and beyond their dish-drying duties, I decided to give towels as home decòr a try.

Inspired by these suggestions, (but not feeling crafty enough to get stitching or framing), I picked out some of our newest towels to try a few ideas of my own.

Tea towels can be used a curtains, turned in to pillows (as several of our reviewers have suggested in the past), or framed (also suggested in a customer review).

I absolutely love coffee and tea, so for my first towel decòr experiment I chose Sara Selepouchin’s Tea and Coffee diagram towels.

I didn’t get too fancy with the tea tea towel, but I do love the idea of having a tea towel diagraming tea! I hung the towel on my oven, right near my tea pot, so this one might end up soaking up a spill or drying a dish at some point. But for now, it just looks really nice hanging in my kitchen.

The coffee towel is another story, though. I can’t bear the thought of this lovely piece of textile art– a tribute to one of my all time favorite things–cleaning up kitchen messes.

First, I ironed the towel, because it came out of the packaging a little creased. Then, I refolded it to fit the space I wanted it to cover–a weird, painted over door on my kitchen wall.

I used nails to hang a thick string across the space, then used clothespins to hang the towel, creating a clothesline look. For a more rustic feel, you could do this with twine or frayed rope.

Simply adding two towels to my kitchen was a big improvement. I’d much rather look at Sara’s delightful diagrams than my old oven or the thick paint over the mystery door.

The towels look great in the kitchen, so I wondered if the same trick would work in another room and chose the Typographic Tongue Twister Towel to add a nice pop of color to the living room.

My husband built a fancy oak cover for our radiator that also acts as an end table. It’s beautiful, but I worry about it getting scratched or ruined by someone not using a coaster. This towel solves that problem. It makes a great table runner, because it’s small enough that it doesn’t cover up all of the wood’s natural beauty. It’s fun, colorful, and really looks great with my giant paperclip print.

I love the design so much, that I might actually frame the towel and hang it someday. But for now, it’s keeping my end table/ radiator cover safe while adding color and style to the room.

Wooden Drawing Model Guy agrees and gives the Typographic Towel a thumbs-up. Or he would…if he had thumbs.

The Uncommon Life

Giveaway: Show Us Your Colorful Mug Shot!

May 18, 2012

The original Face Mug has gotten a lot of attention since he first looked at us with those wide eyes, flashed that perfect (for stuffing with cookies) smile, and landed in our lineup.

We’ve heard gifting stories of how he’s made loved ones laugh, suggestions for filling him with different drink and treat combos, and some interesting alternate uses–like a business card holder with candy on top or a cheerful place to pot a plant. But one thing we’ve heard time and time again is that folks would love to see this character in color.

While Mr. Mug isn’t exactly on hand in color just yet, he is available for purchase on pre-sale and can be yours as a set of two in warm or cool colors. And, to add to the fun, we’re giving away all four to one winner!

Entering is easy. Just send us your best, most colorful mug shot. Use colorful props, bright outfits, and bold backgrounds. Or, take a photo with a color-altering Instagram filter, edit with your favorite program, or come up with something even more creative!

Post the photo to our Facebook timeline and we will post it in our Show Us Your Colorful Mug Shot album.  Share it with your friends and get them to “like” and comment on your photo. Tell your friends to tell two friends and so on, and so on… because the photo that gets the most Facebook love wins a set of these technicolor mug!

We’ll announce the winner on June 1, so start snapping, editing, and spreading the word!