Browsing Tag

Crafts

Gift Guides

Gift Lab: Easy Weaving Without Jumping Through Hoops

September 29, 2015

Valerie

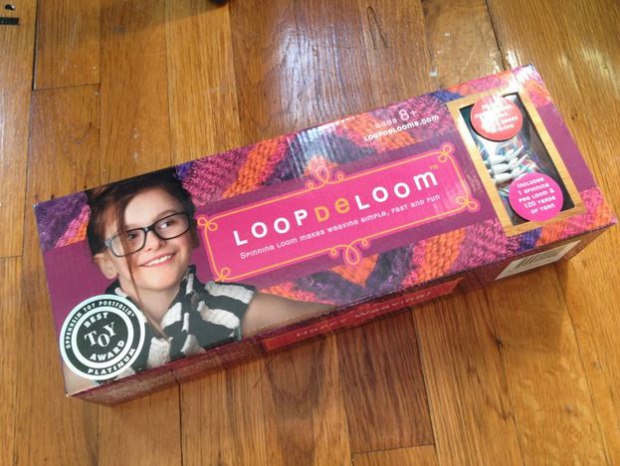
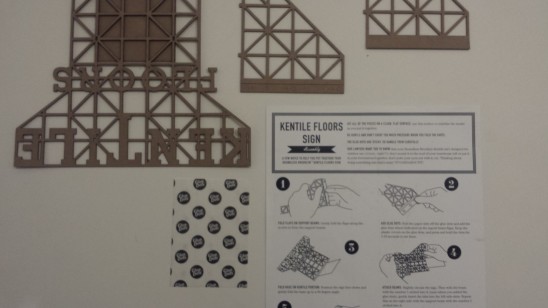
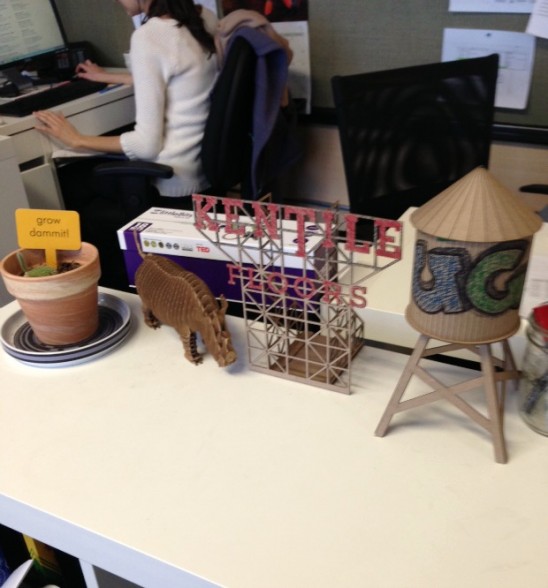
Product:  Easy Weaving Loom

Research:
I already know how to knit and crochet, so I’m ready for a new textile challenge. The Easy Weaving Loom caught my eye the minute I saw it in This Just In. After watching this video I was sure I was up for the challenge. It seems simple enough, and once I get the hang of it I can begin to explore different materials and textures. There are endless possibilities!

Capture

Hypothesis:
I completed my experiment in June, and I wanted to make something that would be useful right away. The product story claims that when using this item, “In no time you’ll have a professional looking woven masterpiece than can become a stylish scarf, or cellphone or sunglasses case.” A stylish scarf, while fun to make, would not have be seasonally appropriate. And while the projects that are possible are not limited to these three, I decided a sunglasses case was a good place to start. It’s basic and small enough to finish quickly, so I figured it was good practice and I’d be making something to accompany me to the beach in no time!

Continue Reading…

Gift Guides

Gift Lab: Build Your Own Brooklyn

February 20, 2015

Rocky |UncommonGoods

Product: DIY Brooklyn Skyline Kits

Research:
I think images of artwork are great. But I think videos of artwork being created are so much better. That must mean that GoPro videos from the perspective of the artist creating a piece are the best! At least that’s my theory… which brings us to today’s Gift Lab. I took you out to the beach in my last blog post to demo a product. This time around, you’re going inside my head to see something cool get built from the bottom up.

Hypothesis:
Our DIY Brooklyn Skyline Kits offer the chance for you to craft a mini version of two signature structures in New York, the Kentile Floors sign and your ordinary rooftop water tower. It caught my eye after I saw the two shots of custom designed water towers on our product page.

DIY Watertower | UncommonGoods
DIY Brooklyn Skylines - Watertower | UncommonGoods

Perfect product to test my theory with! First off, these are hot. Nice job Zero Productivity and Atomiko. But more importantly, I can gauge how well we’re able to see something being constructed and designed, without spending hours on hours doing it. I haven’t drawn anything in years. A lot of effort would’ve been needed to produce something that gives my 5-year-old self some competition.

I was also glad to see that two different versions of the kit existed. While doing research on best practices for filming (read: watching GoPro videos on Youtube), I found it difficult to tell which GoPro dock to use for this; chest mount or head mount? So I bought both. I decided that I’d use one mount for one kit and another mount for the other.

Two DIY Brooklyn Skyline kits, two mounts, and one GoPro in hand later… the test was ready to begin.

Testing GoPro with DIY Brooklyn Skyline Kits | UncommonGoods

Experiment:
I started with the Water Tower kit first, for no other reason than wanting to get closer to fantasizing about being a graffiti artist. After I laid all of the cardboard pieces on the table as instructed, I strapped the GoPro chest mount on, pressed record and got to work.

Here’s a closeup of the major pieces made for the water tower.
Build Your Own Brooklyn Watertower | UncommonGoods

Now it was time to design it. I grabbed a pack of Crayola markers and started doodling.

Finished Watertower | UncommonGoods

The first immediate takeaway – Tagging my water tower before building it would’ve been the better idea. The advantage of utilizing a flat surface didn’t cross my mind even slightly; until it was time to record myself doing it. That explains the split between the clips. I had to game plan.

The other thing was the actual video. In order to learn more about using the GoPro, I turned to Wistia.com’s #GoProWeek as a resource. Every day for that week, they shared a different pro tip (no pun intended) for getting the best shot. One of the techniques I used was the time-lapse recording feature that snaps pictures every few seconds, instead of actually recording straight through. I wasn’t a fan of the final result, because the footage came out too choppy. I think I set the timer in between shots too far apart. I decided to make sure to use the other recommended method for the next kit; shooting normally and speeding up the footage in a video editor.

Besides that, the rest of the process was smooth sailing and more fun than expected. The maker’s of the kits provided clear step-by-step assembly directions and all pieces worked as intended. Any edge that needed folding went over smoothly. The laser cut tabs and indents fit perfectly into each other. Connecting the pieces was a snap (that pun, intended). The biggest surprise was the glue; it did not leave a mess on my hands or the table I worked on. It comes already setup in drops that are separated by perforated plastic. When the instructions tell you to grab one, just rip one dot from the pack, peel off the plastic covering, and apply to the marked area. That easy.

Glue Dots

Next up was recording the Kentile Floors sign DIY kit with the GoPro attached to the head mount. You’ll notice that it begins with me filling in the letters first, and then moving on to putting it together.

The simplicity of the structure’s design made assembly much quicker. There wasn’t much of a surface to draw on but filling in the narrow letters required a little bit of time. I really like the point of view that the head cam captured. It feels like you’re actually putting it together rather than observing someone else do it.

Kentile Floors Sign Kit | UncommonGoods

Conclusion:
All in all, I’m convinced that my theory is correct. Watching art creation from a GoPro perspective is a cool experience that helps anyone appreciate the process behind the final result more. It’s amazing to see what goes into pieces, especially from our assortment, I’d imagine. We have a wide selection of uncommon goods that obviously require an uncommon approach to create.

In retrospect, I see where areas for improvement lay. In a future flick, I would:

  • Adjust the speed back to its normal rate at certain points in the video. There are some scenes where it would have made a better experience, such as when I was working on a small detail like applying the glue dots. It also would’ve been a great way to end it so you see the final product as it is just completed.
  • Angle the GoPro camera on the head mount down a few more degrees.
  • Add some background music.

DIY Skyline Kits as Desk Accessories | UncommonGoods

The Skyline Kits made for a great GoPro test run, and I’d definitely recommend them to someone looking for a fun and easy DIY.  What’s even better? I’m left with two new desk additions that visitors can stop and admire. Long overdue, since the Levitron Lamp had been retired for some time now.


Gift Guides

How to Make Your Own Stamps with the Carve-A-Stamp Kit

November 19, 2013

Carve-A-Stamp Kit | UncommonGoodsWhen us Marketing Team gals heard about the new Carve-A-Stamp Kit, we wanted to test it our for ourselves. So a couple weeks ago, we ended work things a little early for some crafting, gossip, and girly tunes in a secluded conference room in the office. (Ok, there were no tunes but if there were, it probably would have been something like Beyonce or Carole King. Or just Beyoncé.) We learned a lot in that small room. Not just about each other, but the kit in general. Here are some things we learned.

Carve-A-Stamp Kit | UncommonGoods
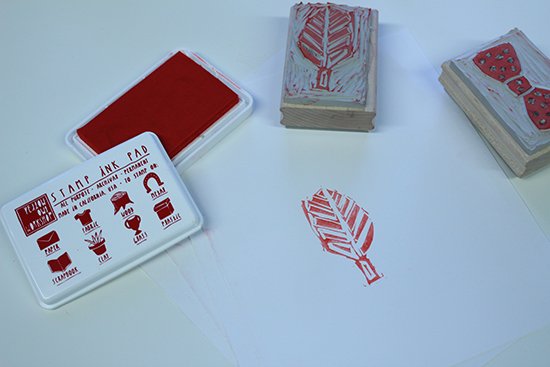
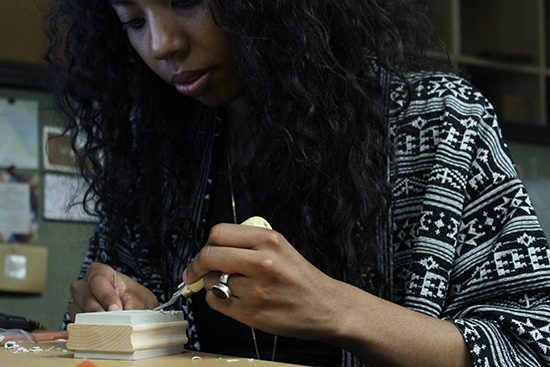
1. The kit comes with easy to follow and beautifully illustrated instructions, 25 original templates designed by Owl City Studio, transfer paper, a stamp block with two sides for carving, a carving tool with multiple blades, a red stamp pad, and a muslin bag to store your finished product.

2. The designs are adorable. It was hard for me to choose so I ended up doing the bow and the polka dot bow tie. Good thing the stamp was two-sided – I have an obsession with bows and am terrible at making decisions. Cassie decided on the owl and Emily on the leaf.

Carve-A-Stamp Kit | UncommonGoods
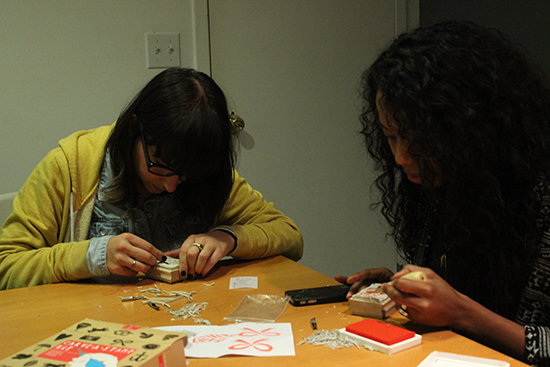
3. The transfer paper is super easy to use. All you had to do was trace one of the designs, place the paper on top of your stamp block, and rub gently to transfer the image onto the stamp. The image showed up nice and clear on the rubber and in the proper direction. Remember: stamps work backwards!

Carve-A-Stamp Kit | UncommonGoods
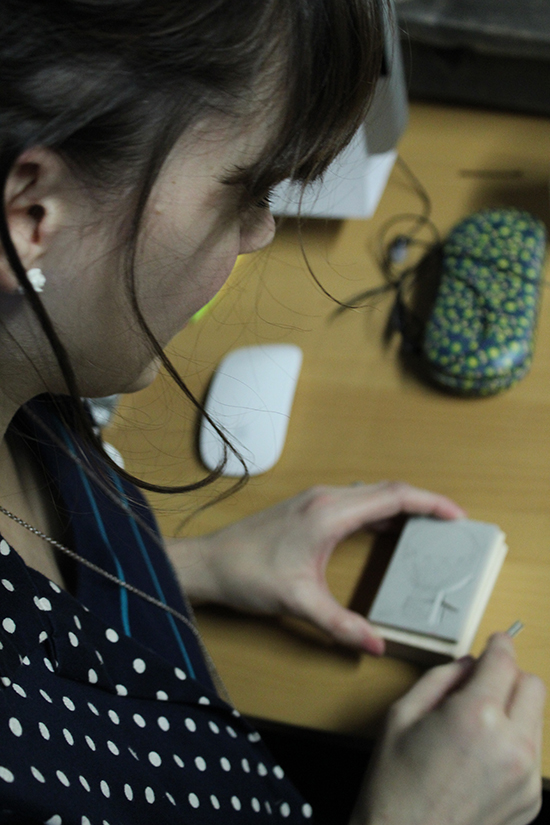
4. The transfer paper also comes in handy when you’re free-handing your design. Fancy-pants graphic designer Jessica drew her stamp creation by hand, a hot air balloon, and used the transfer paper to recreate her original design onto the stamp block.

Carve-A-Stamp Kit | UncommonGoods5. Not every carving tool is for everyone. Since all of our designs were so different – some curvy, another more jagged, some with tiny details and dots – we each found our own favorite carving tool. Test them all to figure out which one works best for you.

Carve-A-Stamp Kit | UncommonGoods6. The finished product is a lot prettier than what you carved. We all looked at our designs when we were done and said “ick” – in unison. But once we stamped the design on some paper, they all looked amazing. All those little imperfections you see (since your eyeballs are probably three inches from the stamp while you’re working) don’t show up when you use the stamp. Plus stamps are supposed to be a little imperfect. That’s their charm!

Happy stamping!

Design

How to throw a Geek Baby Shower

July 29, 2013

How to throw a geek baby shower | UncommonGoodsA couple months ago, our staff threw a baby shower for Naomi. Hopeful for her little girl to be a tiny scientist, Naomi asked for a series of baby items with a geek theme from our assortment. We were so impressed and excited for her that we put together some crafts to throw a geeky baby shower.

Beeker plastic cups | UncommonGoods
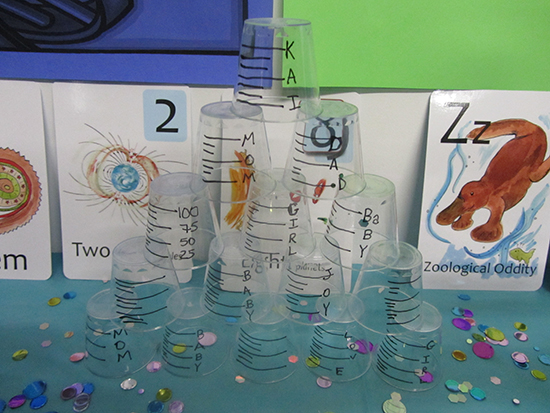
Clear plastic cups are easily transformed into beakers with the help of a marker.

Test tubes for punch! | UncommonGoods
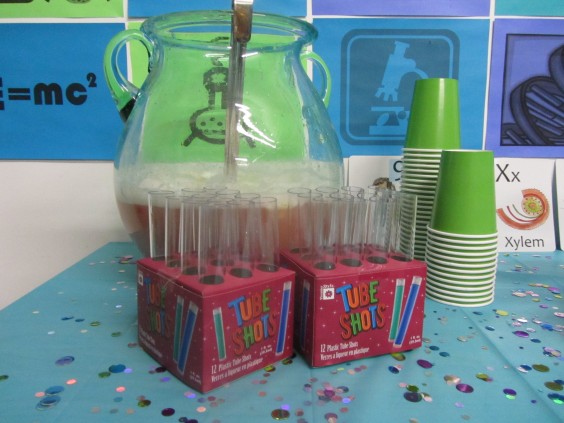
For those interested in taking smaller sips, test tubes are another beverage vessel choice. Plus they make the table look like a lab.
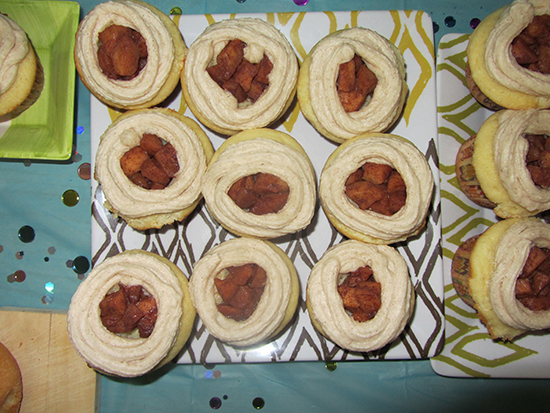
Apple Pi Cupcakes | UncommonGoodsApple Pi Cupcakes!

Geek themed cupcake toppers | UncommonGoodsWe made cupcake toppers from images we found on the web. Print out two identical images and glue with a toothpick or skewer in the middle.

Solar mobile | UncommonGoods
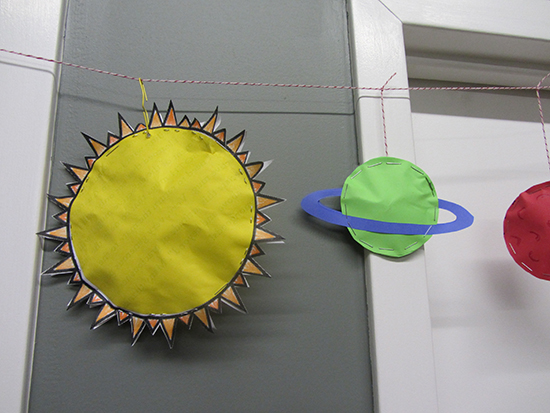
Just like in elementary school, a mobile of the solar system was a fun and easy project. With some paper, tempera paint, string, and cotton balls you can recreate the plants in our solar system for a colorful decoration.

Decorate with gifts | UncommonGoodsOn the tables, we used the Nerd Flashcards that Naomi requested as a gift to keep the theme going.

Naomi's Geek Baby Shower | UncommonGoodsJudging by the smile on Naomi’s face, our crafts were worth the time and papercuts!

Design

What to do with all these flowers!

May 16, 2013

The trees, bushes, and bulbs are all in bloom and there are flowers everywhere! So many flowers! Kind of a great problem to have. Here are some of my favorite blog posts about how to take those blooms out of the garden and incorporate them in your home decor (and wardrobe!) in truly uncommon ways.

Flowers make a lovely centerpiece, but liven up each place setting with a fresh flower tied with each napkin. Use a collection of twine, jute, and other crafty scraps like Rebecca does in her tutorial on A Daily Something. It’s amazing how those peonies, pop against those neutral napkins and plates.

Speaking of found objects, I love the look of mismatched vintage bottles and jars as bud vases. I tend to collect a lot of old glass bottles and have never considered displaying them all together, tying the collection together with a matching bud in each bottle like Elsie has done on A Beautiful Mess.

The little girl inside of me wants to lay in a field making daisy chains all day and this DIY flower crown on Project Wedding can help me accomplish wearing flowers in a chicer way. A big flower crown is a beautiful replacement for a veil on a Bohemian bride, but I want one for Saturdays. I want to walk around my neighborhood like a chorus member in Hair and proclaim myself the flower princess.

I can’t stop thinking about this handmade banner by Kelly of Studio DIY. Something about the drab cardboard background, the bright white lettering, and the pops of bright, fresh color feels so inviting (peonies!). That banner can say just about anything – Surprise!, Beinvenue, Happy Birthday. This is a craft I plan on making very soon. Seriously though, what is it about peonies that is so beautiful?!*

Another craft I want to do soon is Elsie’s floral garland on A Beautiful Mess. I love buntings and garlands in all forms – pom-poms, penants, tinsel – and this is one of the most beautiful ones I have seen on the Internets. It reminds me a lot of the popcorn garlands we made for the Christmas tree as a kid and sounds just as easy (however, I don’t know how my mom will feel about me traveling around her garden with a needle and thread). What’s even better about this garland is it will only get better with age – when the flowers dry and start changing color it will take one a completely new look.

George Harrison wisely once said “All things must pass” (actually he says it a lot of times within the course of three minutes), and so too will fresh flowers so start thinking what can be done once they begin to wilt and fade. I love this pressed flower tutorial that Esther did on Pamplemousse but if you want to know everything there is to know about pressing flowers go straight to the source – Lady Martha!

What’s a better way to preserve dead flowers than potpourri!? Store it in mason jars like in this tutorial on the Free People blog. Something about the mason jars makes it look a lot less like my grandmother’s potpourri.

Happy crafting, flower children!

Design

Justina Blakeney’s 5 Favorite Baby Pinterest Boards

July 30, 2012

Hello fellow uncommoners! I’m Justina, a designer, curator and blogger and soon-to-be mom! (my due date is this week — ahhh!) I am also hopelessly addicted to Pinterest. I have over 50 boards that I use to collect ideas and inspirations for every aspect of my life. My Little Boomba board was instrumental in helping me to come up with ideas of how to decorate my nursery, what items to add to my baby shower registry, must have eco-friendly toys and clothes…and a ton of other wacky and awesome ideas. With over 1,000,000 followers on Pinterest, some of my pins were loved and some created quite a stir–but ALL of my pins got me excited to start this new chapter of my life as a mom.

I am thrilled to be here today to share The Goods with you: some of my favorite baby-centric Pinterest boards by some of the most stylish ladies around. These are mommas that have inspired me throughout my pregnancy and helped me get ready for this huge leap into motherhood. Get ready to start repinning!

Designer and Design blogger Joy Cho is a friend who has helped me a lot throughout my pregnancy–so open and positive, she’s been awesome. Her nine-month old Ruby also has some killer hand-me-downs. Her baby board is a fave, especially for the clothing.

Janet Sherman who has a kids clothing line, has a few really great boards for kids and babies–and I just dig her style. It’s playful and carefree.

My friend Sofia Alberti, who just had her second baby has my go-to board for boho baby finds, especially for decor. It’s a magical little place.


Hanae Ono’s Kids Wear board is another favorite.

Deborah Beau has several sweet kid’s boards, one of the most inspiring, in my opinion, is her Crafty and Creative and Colourful boards– with over 1000 really sweet craft ideas for kids.

Check out Justina’s favorite baby gifts from UncommonGoods!


main image by Annie McElwain. featured image by Bonnie Tsang. courtesty of Justina Blakeney.

The Uncommon Life

How to Style Agate Centerpieces

June 11, 2012

Whether you are throwing a backyard dinner party or planning a wedding, centerpiece ideas are sometimes a daunting task. They are the focal point of your sit-down meal and can really bring a room together if they are styled right. Although the Agate Cheese Platters are great for serving up snack, they are also versatile and could fit into a number of decor schemes. On the bottom of each platter are three rubber bumpers which creates a nice platform. The jewel-tone platters also have a natural shiny finish so they will glow in the dim light of a party.

I was interested in seeing how the Agate Cheese Platters would work in a centerpiece design, I took them home, put my decorating hands to work and came up with three different ways to style them.

CRAFTY
Some of the cutest centerpiece ideas out there are composed of found items. Make your centerpieces personal with a craft touch. Create a small penant banner with washi tape and neon twine and string it between two tall sticks. I used wooden knitting needles but another great option are painted twigs. Personalize a mason jar by wrapping it in colored yarn or twine. Lastly, I pulled some guitar picks and a harmonica from our collection to add some personality to this table decoration.

CHIC
These eggplant platter just scream glamour to me so I wanted to see a sleeker look. I pulled out some crystal and glass candle holders that would reflect nicely when the lights get low. Around the platter, I sprinkled some white flower petals to soften the entire look. I only wish it was dark enough to test the glow of the platter in candlelight but was pleased to see the reflection of the crystal on the platter.

RUSTIC
I thought it would be an interesting contrast to add some rustic charm to the polished platters so I started with an old honey jar of white flowers tied with natural twine. I set the jar in a bed of dried moss from the craft store and scattered small twigs and stones. I was so happy with the little enchanted forest I created.

Design

Handmade Paperback Valentines

February 1, 2012

There is nothing more special than a handmade gift from the person you love, especially on Valentine’s Day. I wanted to get especially crafty this year and upcycle a valentine. I found some great inspiration in Playing with Books: The Art of Upcycling, Deconstructing and Reimagining the Book by Jason Thompson of Rag & Bone Bindery. Equipped with scissors, a glue stick, double-stick tape and a couple of old books my neighbors were throwing away, I got to work!


I loved the idea of making my own envelope. Why not make the package as special as the card? We take so much care when wrapping a present and cards can be given with as much excitement. Instead of opening up an envelope to use as a template as the book suggests, I found a template online. I resized the image in Word and was able to make as many different sizes as I liked.


The Origami flower was so much fun to make and turned out to be so pretty. I think they would be great to tuck away a bunch of these flowers in small corners of your home with sweet messages for your Valentine to find throughout the day.


Since I usually plan a present for my beau, I also decided to craft a bow from an old book. After my first sloppy attempt I realized this craft really needed double-stick tape like the book called for instead of my glue stick. I used pages from a colorful catalog and I am so excited with the way it turned out.

Are you planning a handmade Valentine’s Day?