
Hadley, UncommonGoods’ Junior Content Creator, thinks about tortillas. (Note the glint in her eye.)
Product
Research
I’m an avid cook, and so is my boyfriend, Royce. We often make dinner together, and eight-ish times out of ten, we make one tasty thing: tacos. (Curry’s a common winter dish, too, but I digress.) I’d been talking Royce’s ear off for months about how we should try making our own tortillas, but we never got around to it. It follows, then, that I got pretty pumped when I saw our new Homemade Tortilla Kit for sale. It felt like I’d finally found my chance to force us into making our own tortillas, a project that would otherwise have continued to elude us for, you know, more months.
Hypothesis
With the Homemade Tortilla Kit, Royce and I will finally be able to free ourselves of store-bought corn tortillas and add a new, exciting, and (literally) fresh dimension to our habitual taco nights. Plus, we’ll be able to brag that we make our tortillas from scratch now, something that will surely incite feelings of jealousy in his many proud foodie friends. I enjoy feeling superior when I can,* so this is a plus.
*I kid.
Experiment
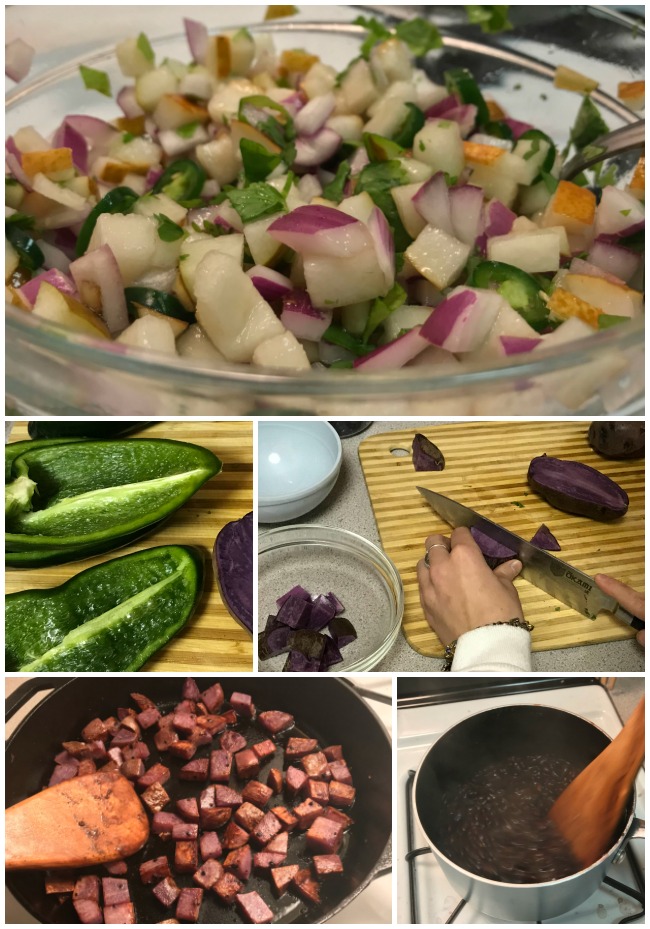
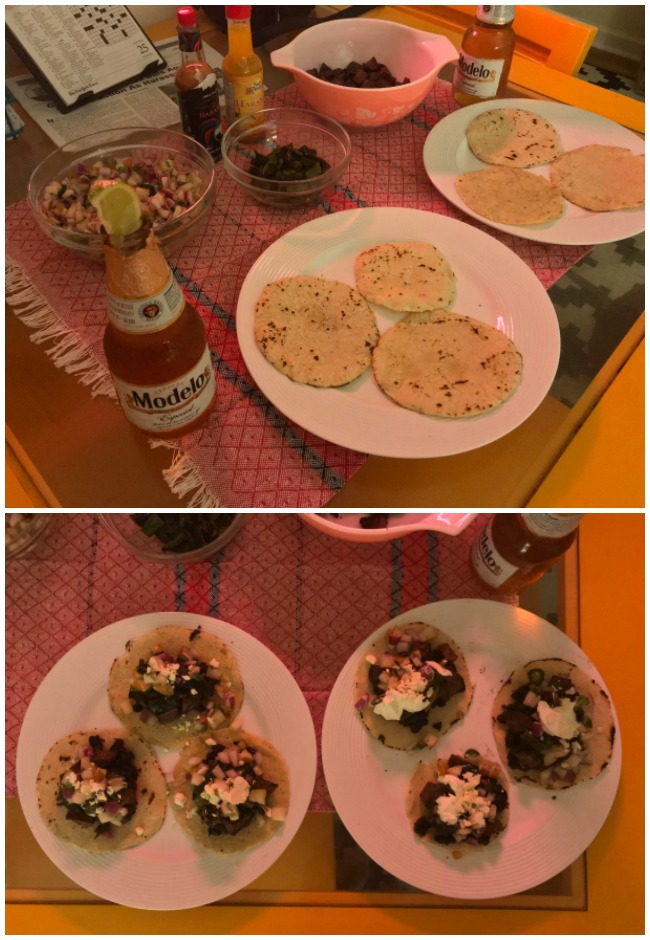
Royce and I began by planning our menu a couple of days in advance. Because of the awesome GrowNYC Fresh Food Box program, which offers fresh, locally grown produce for only $15 every Tuesday at our office in the Brooklyn Army Terminal, we had a bunch of tasty fixings on hand: Adirondack Blue potatoes, dry black beans (organic, even), fresh cilantro, Bosc pears, and huge bulbs of garlic. I hate wasting food, so we came up with a plan that would make use of the remnants of our last week’s box and, in theory, taste good: Blue potato and roasted poblano tacos with black beans and pear salsa, plus cotija cheese, hot sauce, and sour cream, all staples in our household.
After a lengthy debate about whether or not to soak our black beans, we settled on not soaking, grabbed any goods we still needed, and, on Friday night, got down to business. First up, we prepped our black beans (recipe here) and set them to simmer, assuming they’d only need an hour or so to cook. I don’t know what we did, but this was totally wrong. They took, like, three hours. But that’s not the tortilla kit’s fault, so I won’t dwell on it.
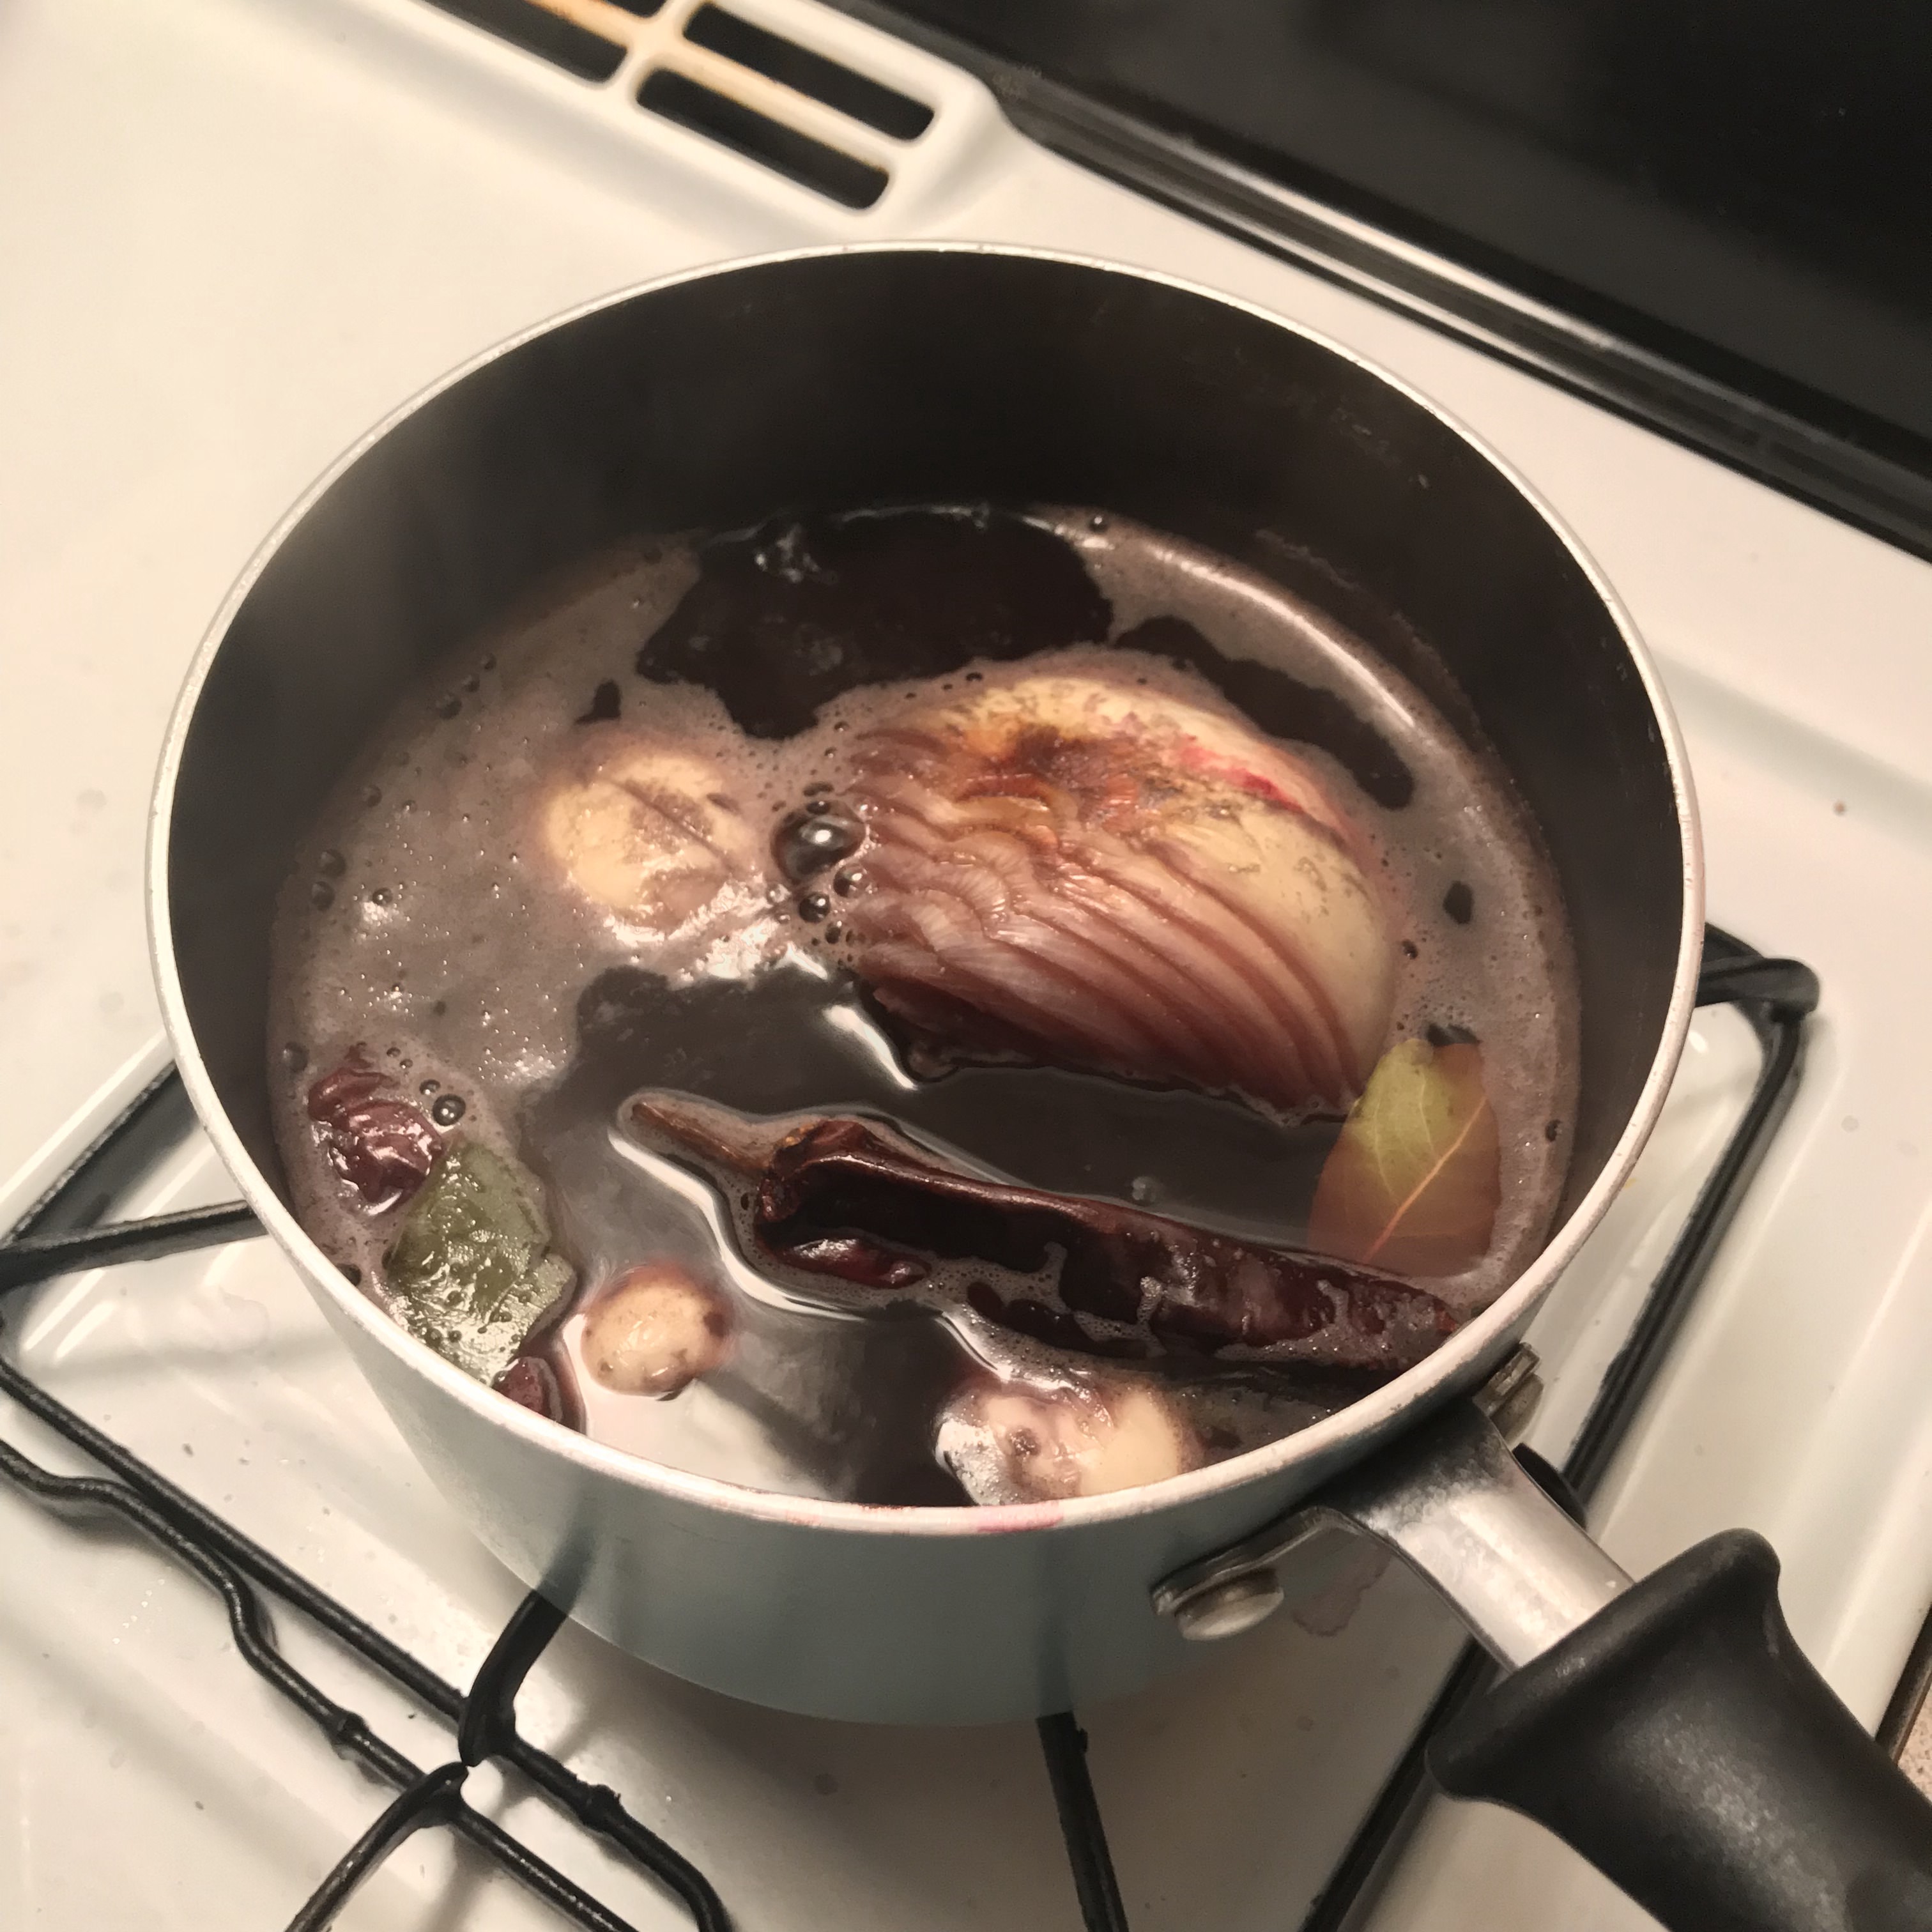
Beans—with onion, garlic, bay leaves, dried chiles, and cumin seed—simmering on the stove.
Next up: pear salsa (recipe here). We were both skeptical that pear salsa would actually taste good, but it turned out surprisingly tasty, and very pretty, with a pleasing crunchy texture and a bit of sweetness that we predicted would offset the salty potatoes and smoky poblano pretty nicely. We then prepped our poblanos and potatoes, setting the poblanos on a baking sheet to roast and pan-frying little cubes of potato until crispy, all the while tending to our slow-cooking beans like impatient, hungry children.
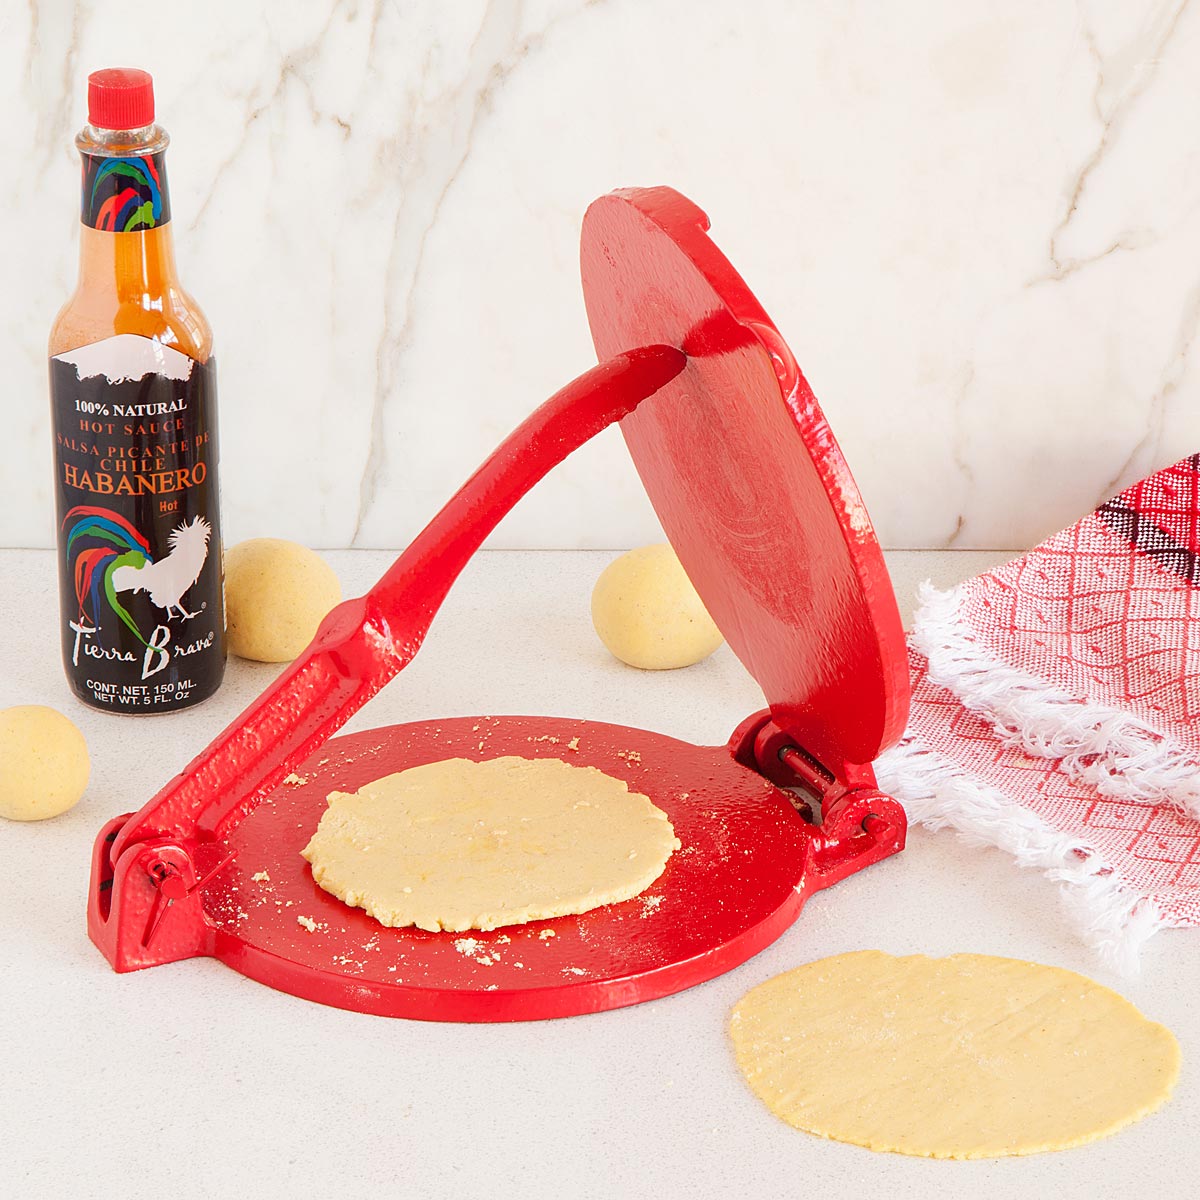
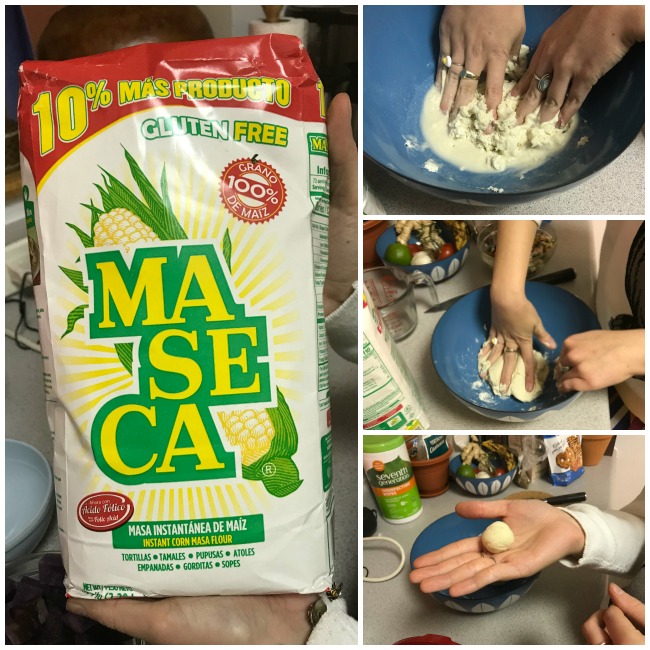
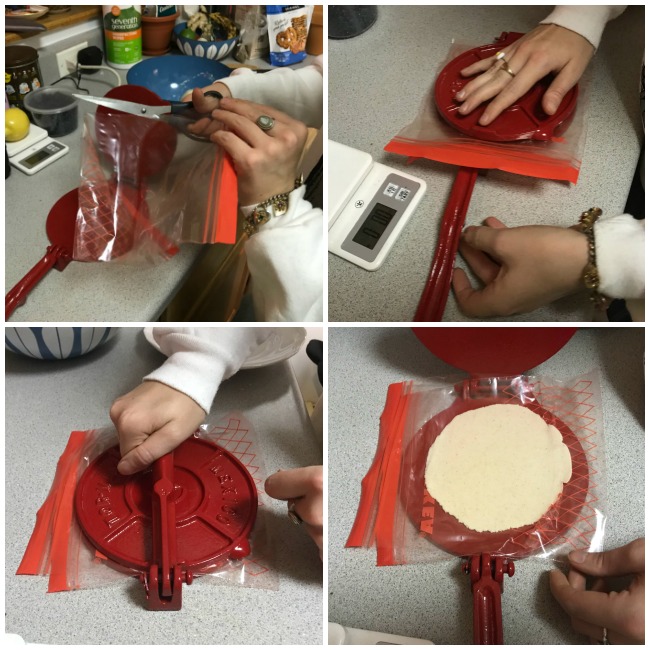
At long last, it was time for us to craft our tortillas. This was by far the easiest part of the night, though the technique took a bit of getting used to. Luckily, the kit came with a snazzy pamphlet that included a recipe for corn tortilla dough and cooking tips, which really helped us. The only things we actually needed that didn’t come with the kit were corn flour (masa harina, big bags of which are readily available in Brooklyn grocery stores), water, a ziplock bag, and some scissors, for reasons that will become clear in a moment.
First, we made the dough. We followed the recipe in the pamphlet, but the dough felt a little wet to the touch, so we added more corn flour until it was smooth, but pliable. The texture was a little like floam, but without the weird microbeads—very springy. I’m lucky enough to have a pastry scale, so I was able to weigh my balls of dough and ensure each were big enough to make full-sized tortillas, which each require about 1 oz. of dough. If you don’t, shoot for the size of a ping pong ball, give or take a few millimeters.
Next, we needed to press the tortillas. To do this, the pamphlet recommends cutting a ziplock bag down the sides and placing it inside the tortilla press included in the kit. This keeps your tortillas from sticking to the press and makes them easier to remove for cooking. What the pamphlet doesn’t recommend is dusting a little bit of corn flour on the inside of the bag to keep your tortillas from sticking there, but we learned that the hard way after one failed press. According to the pamphlet, for an optimal tortilla, you should press once, then rotate the bag and tortilla 90 degrees and press again. This seemed to work well, but take note: I pressed too hard initially and totally flattened my first tortilla. You need to be firm, but you don’t need to absolutely crush it. Otherwise, you won’t be able to get it from bag to pan without a lot of fuss.
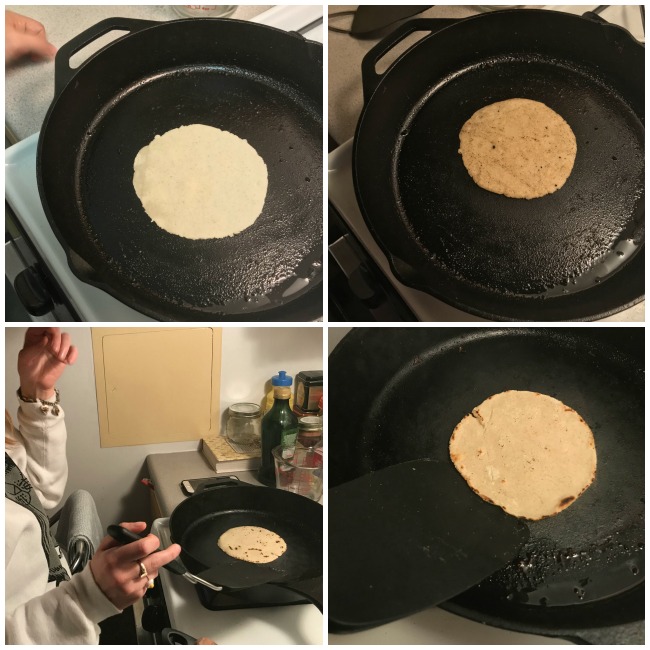
Once we got the technique down, the tortillas were actually really, really easy to make. Once pressed, simply add them to a pan and heat each side for roughly 60 seconds. They’ll puff up slightly, and feel a bit tough when you remove them from the pan, but don’t worry: They soften up quickly for a delicious pillowy texture once you’re ready to eat. Also, the towel included with the tortilla kit is apparently a traditional cloth used to keep tortillas warm between the pan and your plate, but we didn’t realize that and used it to set our table instead. Whoops. The tortillas tasted fine anyway, though.
With all components ready, we set our table and chowed down. The result: Warm, perfectly pliable tortillas filled with a delectable melange of fillings, hitting on all of our favorite food textures, from crispy to crunchy to creamy to, well, soft. We also taste-tested the habañero hot sauce that comes with the kit, and it was a huge hit—spicy, but not overwhelmingly so, and wonderfully flavorful.
Conclusion
Though it requires a wee bit of trial and error, this thing is awesome. The tortillas we made were delicious, easy to make, and unlike anything I’d ever purchased in a store. (The closest approximation was something I had at Guisados Tacos in LA, where they advertise fresh handmade tortillas.) If you’re a frequent taco-eater, I encourage you to give it a try, as it’s fully worth the investment. It’ll change the whole experience, and it only adds 10 extra minutes to your cook time. That’s how easy it is to use!
If you’re interested in learning how to make the very tacos Hadley and Royce made for this post, scroll down for their (somewhat approximate) recipes.
Snag your very own Homemade Tortilla Kit here »
Pear Salsa
- 2 Bosc pears
- 1/2 red onion
- 2 serrano peppers
- Juice of 1 lime
- Handful freshly chopped cilantro
- Salt, sugar to taste
Note: We made this first, which was a good call—the flavor only deepens as it sits. That said, the pears are crunchiest when the salsa is freshly made, so if you really want something to chomp on, I’d suggest making it right before pressing your tortillas.
- Dice pears and 1/2 onion and combine in a medium mixing bowl.
- Thinly slice serrano peppers and add to pear and onion mixture. If you want a little extra heat, leave the seeds in.
- Add lime juice and chopped cilantro and toss mixture to coat with juice. Taste and add salt and/or sugar as you please.
Roasted Poblano Peppers
- 2 poblano peppers, halved and seeded, stems intact
- Olive oil (a generous glug—maybe 1 Tbsp or so)
- Salt, pepper to taste
Note: When Royce and I make poblanos, we typically fire-roast them on the stove, which is a pretty simple process: Turn burner on; place poblano on burner; rotate with metal tongs until the flesh is charred and makes a somewhat consistent popping sound; let cool and removed charred flesh with the aid of a damp paper towel, then halve, de-seed, chop, and add to your taco. Because we were already making a bunch of other stuff on the stove, we used this method instead, which did the trick, though fire-roasting gives a richer flavor and somewhat better texture.
- Preheat oven to 350 degrees.
- Place poblano halves on a baking sheet, skin side up, and brush with oil. Add salt and pepper to taste.
- Place in oven for 15-20 minutes, flipping for 5 minutes or so halfway through. When finished, let cool and peel away charred flesh, then chop, removing stems.
Crispy Blue Potatoes
- 2 Adirondack Blue potatoes, unpeeled
- Another generous glug of olive oil
- 2 cloves garlic, chopped
- Spices of your choice to taste—we used salt, pepper, and cumin
No real note here except to say that you can probably make this with regular old potatoes and be fine—the blue potatoes were just what we had (and make for a fun, pretty color).
- Chop potatoes into small cubes. Don’t bother to peel or parboil them; the skin gets crispy and delicious and parboiling isn’t necessary for the texture you want here.
- Add olive oil and garlic to skillet and sauté until garlic is fragrant, about 30 seconds.
- Add potatoes and cook, stirring occasionally, until crispy and lightly charred. As potatoes near readiness, add salt, pepper, and cumin—or whatever other spices you desire—and stir to coat.
Slow-Cooked Spiced Black Beans
- 8 oz. dry black beans
- 1/2 white onion
- 3 cloves garlic (we used huge cloves, so add more if you don’t have a massive mutant garlic bulb hanging around)
- A touch of freshly squeezed lime juice—we used what was left after an initial squeeze for the pear salsa
- Assorted spices—we used salt, pepper, a pinch or two cumin seed, 2 bay leaves, and a couple of dried chiles
Note: We didn’t soak our black beans before cooking, so they took forever to make. Don’t do this if you’re really hungry… just heat up some canned beans and add your favorite spices to them. It’s OK, we swear. We used this recipe as a reference.
- Add beans to a small saucepan and add enough water to cover the beans by about 3 inches.
- Add whole 1/2 onion and garlic cloves, also whole, to pan and heat, covered, until water comes to a boil. Remove lid and reduce heat to a very light simmer, adding lime juice.
- Add any whole spices—dried chiles, cumin seed, and bay leaves—and let simmer lightly, stirring occasionally, until beans are cooked through. It took us more than the 1-2 hours stated in the linked recipe to reach optimal doneness, so be sure to monitor closely—don’t just go by time. Add water periodically if the beans become exposed.
- Once beans are done, remove onion, bay leaves, and dried chiles and increase heat to a true simmer for about ten minutes. Liquid should reduce and form a thick sauce. Once that’s done, add any ground spices, like salt and pepper, to taste.
6 Comments
In california, we could also get big bags of masa dough. They seemed to keep forever in the fridge, which was good because they were a huge amount for an Anglo kitchen. Two points: the flour was probably more hydrated than freshly mixed dough, and, there are a lot of other fun things to make with masa dough. Nice post, thank you for the recipes.
Glad you enjoyed, Jean! I am hoping to further explore the world of masa now that I have a big bag of the stuff… I think pupusas, sopes, and tamales are in my future…
i already have a tortilla press, can you share your recipe of the tortillas?
Hi, Ash! I usually go with a one-to-one ration of masa to water, then add a little masa (or a little water) as needed to get the consistency right. It should stick together, like a dough, but it shouldn’t be too wet.
I need to know — What is the advantage of this particular tortilla press compared to the others? It looks like it is any ol’ tortilla press. I’m looking for one that allows me to make thin and thick tortillas. I have had problems with the tortilla only being able to get so thin but it was too thick. What is your experience?
Hi, Ann! Good Q. I haven’t used any other tortilla presses in my day, so I’m not sure exactly how it differs from others, but I will say I managed to make a few tortillas that were a little thin for my taste, so maybe this will work for you. I’d imagine that with a smaller ball of dough and some extra pressure you could get ’em pretty skinny, though you’d need to be careful when stripping them from the plastic lining. This press is also cast iron, so it’s pretty hefty compared to, say, plastic presses you may find elsewhere.