Browsing Tag

Food

Maker Stories

This Just In-spiration: Meet Steve Reid and Judith Irving

April 30, 2015

Our makers never fail to motivate us, encourage our creativity, and fill us with inspiration. So, when a new design enters our assortment, we’re always excited to learn more about the person behind the product.

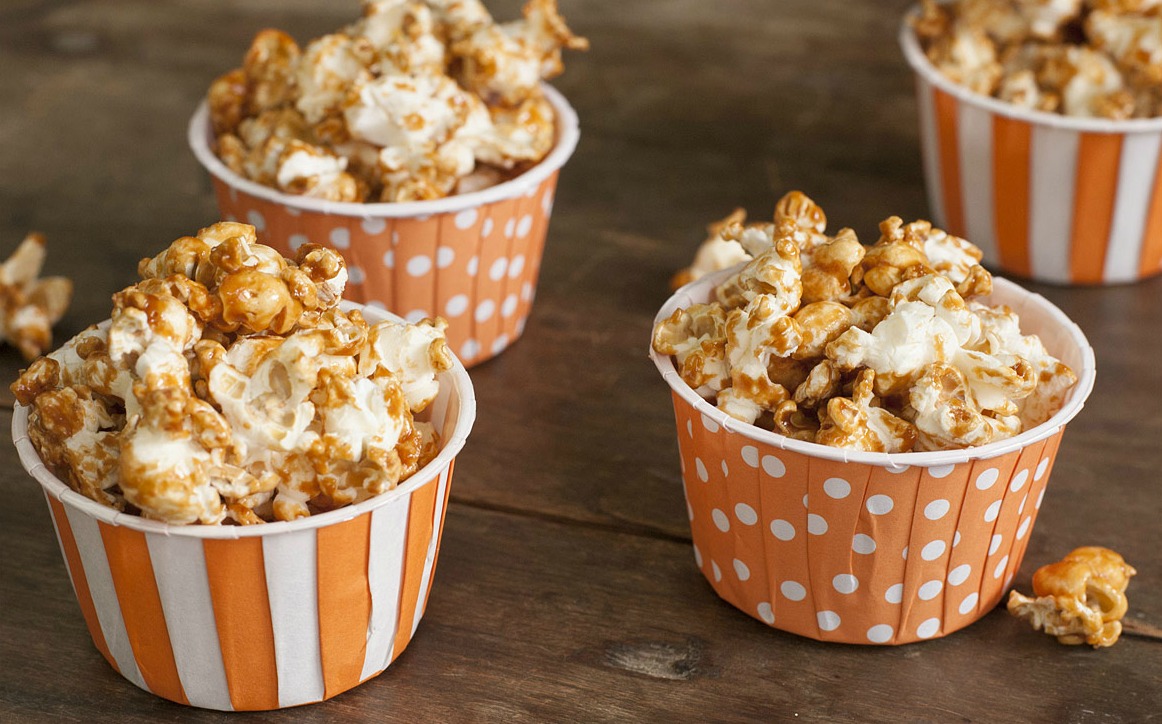
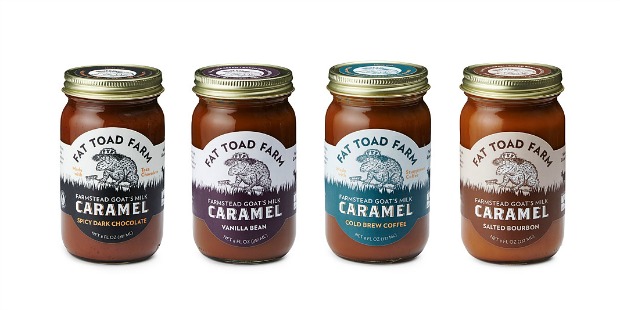
What gets an artist going and keeps them creating is certainly worth sharing, and every great connection starts with a simple introduction. Meet Steve Reid and Judith Irving, creators of our delectable Caramel Sauce Set.

Steve Reid and Judith Irving | Caramel Sauce Sets | UncommonGoods

When did you know you wanted to be makers?
Fat Toad Farm started out as an experiment in homesteading. As a family, we wanted to see how self-sufficient we could be. We began this adventure with some chickens, a garden, and hand-milking a lovely French Alpine doe named Jupiter in our garage. We slowly started to produce more milk than we could use as a family. At that point, my daughter Josey returned home from a five year stay in Mexico. She told us about a Mexican confection called “cajeta” (traditional name for goat’s milk caramel) that she said was very popular all over Mexico and that she had learned how to make. We made some small batches of it on our kitchen stove and it really was quite delicious! We gave some to our friends and family and it was a big hit. We soon realized that we had a really unique and delicious product on our hands and decided to take our “hobby” to the next level. Fast forward eight years and we are now milking 60 goats in a modern milking parlor, making our goat’s milk caramel sauce in our own commercial kitchen, and selling it to over 300 specialty food stores throughout the United States.

What was the most exciting thing about starting your own business?
We have always been excited and grateful to be able to working from our home, on our own farm, using our neighborhood land and working as a family. After years and years of “working out,” this has been a rare privilege. Being able to make decisions and seeing them being implemented from beginning until the end is also very exciting, and sometimes nerve wracking. The ability to make changes and improvements to our business rests solely on our shoulders which can be quite overwhelming and empowering at the same time.

What does your typical day at work look like?
On any given day you will catch Steve or Colene milking the goats early in the morning (6:00) and me [Judith] doing chores. Jenny and either Calley or Christine arrive at 7 to the caramel room Monday through Friday, to start the caramel production process. Jenny stays in there meticulously hand-stirring our velvety caramel sauce for about five hours in traditional copper kettles.

After morning chores are complete, you’ll find me printing off orders and labels at my computer and then preparing the days shipments from our “shipping center” at the back of our small farm store. Inside the farmhouse, Calley and Christine will be at the kitchen table, computers revved up, developing new marketing materials, products, and flavors, and generating all of our social media.

Midday, I do chores again, the caramel finishing team starts “bottling” the caramel until 3, I often do farm tours or handle basic financial work. By 4, the milking and chore team are back at it, the caramel team is done and wrapping up their administrative work. By 7 p.m., milking is done, the chickens are put to bed, the 2 baby goats that get bottles have been fed and everyone is off to whatever it is they are doing that evening to wind down. (Check out the video below to see everyone in action.)


Is there a trinket, talisman, or other inspirational object you keep near? If so, what is it and what does it mean to you?
Walking around the farm you’ll see different kinds of toad figurines of all different colors, shapes, and sizes. In the beginning, when we were trying to think of a name for the farm, we had been walking through our fields and we kept finding these fat, healthy toads hopping as we walked along. Toads are a sign of a healthy ecosystem and fertile lands which we took as a good omen. That is when we became Fat Toad Farm. I think having real toads present as well as little trinkets, helps us remember how we started and how far we have come.

Caramel Corn Made with Fat Toad Farms Caramel

What are some of the things you’ve heard people say upon tasting your caramel creations for the first time?
“Oh my goodness!”
“I could just eat this straight out of the jar with a spoon.”
“I’m going to have to hide this from my husband.”
“I’m going to have to hide this from my wife.”
“This has no calories, right?”
“Mmmmmmmmmmm. Just one more taste…”
“Sweet, but not too sweet. Just right!”
“You can really taste the goat’s milk!”
“This is lick-the-spoon good.”

What quote or mantra keeps you motivated?
“If Britney Spears can make it through 2007, you can get through today.” Surprisingly, we heard the quote on NPR and we all initially just laughed. Once we really thought about it though, it stuck with us. Here on the farm, things can get pretty hard but we have realized you just have to find the light and continue to work towards it.

Caramel Sauce | UncommonGoods

Bring this Caramel Home!

Gift Guides

Gift Lab: Adding a Tropical Twist with Gourmet Island Sugar

December 22, 2014


Louise Geller | UncommonGoods

Product: Gourmet Island Sugar Set

Research:

I hadn’t heard of Old Salt Merchants until I saw their product on the UncommonGoods website, but their adorable packaging and interesting flavors prompted me to take a closer look. A family-run business out of Seattle, Old Salt Merchants makes a point of sourcing fair trade sugar, keeping their products cleanly and simply made, and focusing on a small product line of the highest quality. These are all values I really appreciate, and as an avid home cook I’m always looking for new ingredients and ideas for my kitchen, so I knew I’d have fun using the Gourmet Island Sugar Set to develop a great meal.

AllSugars

Hypothesis:

Using the Lime Slice, Jamaican Ginger, Rum Soaked and Coconut Breeze sugars, I will develop a full meal where each dish includes one of the flavors. They will elevate my recipes and inspire me to try out new ideas.

Experiment:

My boyfriend Paco joined me in my quest to find interesting ways to use the four sugars. We went shopping on a Saturday afternoon and came home loaded up with ideas and ingredients.

Lime_done

Lime Slice Sugar
We decided to start our evening with a cocktail. All four of these flavors could most certainly be used as cocktail ingredients and for delicious sugar rims, but we chose the Lime Slice sugar to try out with one of our favorite cocktails: the traditional Mojito. Paco muddled fresh mint and lime while I prepared a dish of the sugar and a bowl of water to line the rims of our cocktail glasses. The Lime Slice sugar is made with raw sugar, so the granules are large and have a great crunch. The lime adds a bit of acidity and a bit of bitterness – it’s not so delicious on its own, but I could tell when I taste tested it that it would add a lot as an ingredient.

Lime1

I can’t stand overly sweetened cocktails, so I liked the idea of a sugar rim that would allow me to control when I got a shot of sweetness and when my sips were more focused on booze and citrus. The raw sugar also added a textural element to the cocktail that we both found very pleasing. Our cocktails would have been delicious on their own, but the Lime Slice sugar rim definitely gave them a little something special. Although we were sitting on my couch and it was 39 degrees outside, I could have sworn we were poolside in Miami.

Lime2

After pre-dinner cocktails, it was time to get cooking! For the side dish to our meal, we decided to also use the Lime Slice sugar. It was autumn when we conducted the experiment, and that means brussel sprouts are everywhere. One of our favorite preparations for brussel sprouts is to sauté them in toasted sesame oil, then splash a bit of sriracha on top. This time, when they were almost done, we sprinkled on some Lime Slice sugar to temper the spice. The results were delectable – all the flavors married together with no one element overwhelming any of the others. We agreed that the Lime Slice sugar made a great addition to this dish, and I’m looking forward to making it many more times during brussel sprout season!

Lime2_Done

Lime2_1

Rum Soaked Sugar

There are many meats that work well with the use of sugar in glazes or marinades, but I definitely tend to think of pork products as standing up best to sweetness (eg pulled pork, maple bacon, glazed ham, spare ribs). The richness of the meat can hold its own next to a sugar-based topping. I generally don’t want to put too much sugar on my meat, but I thought a small amount of the Rum Soaked sugar would go a long way. A small taste test made it clear that “rum soaked” is an apt way to describe this sugar – it is obvious that there are no artificial flavors happening here. I mixed some garlic, cayenne, salt and pepper in with the sugar and rubbed it on both sides of the pork, then seared it on the stove before transferring to the oven (the best way to get a tender and juicy pork chop). As soon as the sugar started to caramelize, it was clear we were going to have some succulent pork chops on our hands. They were delicious – the rum blended fabulously with the other flavors, and the sweetness was present but not overwhelming. The chops were rich and juicy, and we made short work of them.

While I’m personally not a vegetarian, UncommonGoods is an animal-friendly company, so keep in mind that this recipe is my own. This sugar would also work well for vegetarian or vegan recipes, for those who don’t eat meat. Portobellos would make a good alternative to pork. Or, you  could also try this recipe with traditional meat substitutes like tofu.  The Rum Soaked sugar would also make nice glazed carrots.  Just remember that you’d need to add some oil or melted butter to the sugar and seasoning mixture for any of those, because they don’t have their own fat.

Rum_Done

Jamaican Ginger Sugar
The moment I saw the Jamaican Ginger sugar, I knew I had to pull out one of my favorite childhood recipes for chewy ginger and molasses cookies. The recipe calls for the cookie dough to be rolled into balls and then coated with granulated sugar before being baked. I figured this could only be improved by rolling them in sugar infused with the flavors of fresh ginger. The Jamaican Ginger sugar is also raw, so I knew there would be extra crunch on the cookies, which is a definite bonus in my book – I’m all about textural pairings, and crunchy + chewy is a winner. The ginger adds so much spice to the sugar that you can feel it in your sinuses when you taste it on its own. We were a little worried the flavors would be too strong, but we needn’t have been concerned – the cookie has enough sweetness of its own that the extra kick of ginger is nothing but a joy. This was a huge success, and I will soon be making these cookies again for the holidays!

Ginger_Done

Ginger1

Coconut Breeze Sugar
It’s getting chilly in New York, so hot chocolate has been on my mind. I never buy hot chocolate mixes; I prefer to make my own using unsweetened cocoa powder and adding sugar (again, I’m a bit of a control freak about sweetness). I’ve always loved the combination of coconut and chocolate, so I thought it would be fun to replace the regular granulated sugar I would typically use with the Coconut Breeze sugar. I am calling it CocoCocoa (feel free to use that).

Coconut_Done

I usually use about a tablespoon and a half of cocoa and a tablespoon of sugar to make my hot chocolate, but this time I used a one to one ratio because I was worried about the chocolate overwhelming the coconut flavor. My dutch process cocoa powder packs a big punch, and I still only got a hint of coconut in the finished product. It was delicious, but I was hoping for a more balanced flavor. Next time, I will probably use the coconut breeze sugar to sweeten my fresh whipped cream – I think that will help the flavor stand out more.

Coconut1

And of course, I can’t possibly enjoy cookies and hot chocolate without breaking out my UncommonGoods Face Mug!

FaceMug

Conclusion:

As I’d hoped, the Gourmet Island Sugar Set led us to a delicious meal that was outside the norm of what we’d usually make. We also came up with additional ideas for how to use the different flavors as we were working (lime sugar/sea salt margarita rim, ginger sugar with soy sauce and garlic as a beef marinade, and coconut sugar topping for banana nut muffins, to name a few). I felt good about using this product, knowing each flavor only had two ingredients, all the sugar was fairly traded, and that I was supporting a family-owned small business. I’m excited to use them again!


Gift Guides

Gift Lab: DIY Brunch Ideas (& Recipes!)

November 11, 2014

Laura Frost | UncommonGoods

Product: Itty Bitty Mixer, DIY Butter Kit, Egg Separator

Research:
Brunch on the weekends in Williamsburg, Brooklyn has plenty of great options. But, there are also really long lines for omelets or pancakes or waffles. My boyfriend and I love brunch at home where we can relax in PJs and sip our coffee without food-deprived crowd of folks waiting for breakfast. Only snag is that we usually want different things. He’s not big on the pumpkin craze, and I’m a fan. He prefers waffles and I like light little pancakes. Will we have a happy brunch despite our differences?

DIY Brunch Ideas | Kitchen Tools | UncommonGoods

Experiment:
The two-different-items-brunch menu also gives me the excuse to use the Itty Bitty Mixer! I’m not a huge fan of kitchen gadgets, but this one is pretty great. I love the handcrafted ceramic design. It’s also very practical for making two different pancake flavors, omelets, and dressings. (Seriously, I could do a whole separate blog on small-batch dressings.)

PJ Brunch for Two Menu:

  • Apple Sauce Waffles for Him
  • Pumpkin Pancakes for Her
  • Coffee Required

The night before my planned PJ Brunch I made some fresh butter and roasted pumpkin. I started off with the roasted pumpkin. I cut a sugar pumpkin in half. Sprayed a foil-lined cookie sheet with oil, and roasted them for 40 minutes at 425 degrees. While the pumpkin was in the oven I opened up the DIY Butter Kit so I could have fresh cinnamon-sugar butter for my waffles and pancakes.

The butter kit is really nice to look at, but not the fastest butter to make. Even though I was starting the night before, I didn’t give myself quite enough time. The kit’s butter recipe requires 3 ingredients and 120 minutes (60 of those minutes is just running a mixer). Dilemma: fresh butter is unbelievably good. It’s especially good using it as a spread rather than baking it into something. My waffles and pancakes deserve the best!

I have to confess here, I’ve used a simpler butter kit in the past that required less than 45 minutes, heavy cream, and a jar. I took this route with the butter kit so I still got the awesome fresh butter despite my poor planning.

DIY Butter Kit | UncommonGoods

I had already bought my favorite heavy cream, poured it into the kit’s jar and shook it for about 25 minutes. It’s fun to watch the cream turn into whipped cream then morph into a happy golden blob of fresh butter. The butter then gets rinsed in cold water. That leftover milk in the jar is buttermilk. It’s great to save for pancakes or waffles. (More on that later…)

I divided up my butter so I could make the cinnamon-sugar butter and use the kit to make tomato basil butter, and still have plain butter left over.
Homemade Butter with the DIY Butter Kit

Butter’s done. Pumpkin’s done. Time for bed. Happy brunch in my PJs in the very near future!

Saturday morning- PJ Brunch part one! I want pumpkin waffles with the freshly roasted pumpkin. My guy wants apple sauce waffles with some of the apple sauce I made the previous weekend. I set up shop in the kitchen so I could easily get started. I first made a large batch of batter that I could split for the pancakes and waffles. I put about half the batch into my Itty Bitty Mixer (did I mention I love this thing?!). I then added about a quarter cup of my fresh pumpkin puree. The Itty Bitty Mixer allows the ingredients to blend together quickly and smoothly. It’s also easy to pour the batter out onto my pan.

Making pancakes with the Itty Bitty Mixer

While my pancakes were cooking I put the remaining pancake batter in the Itty Bitty Mixer along with the homemade apple sauce.

Homemade waffles with the Itty Bitty Mixer

The fresh cinnamon-butter was the perfect addition to the pumpkin pancakes and apple sauce waffle.

Homemade brunch with fresh cinnamon butter

Sunday morning-I was on my own for brunch. Not a glum morning, though. I had just enough eggs in the fridge for one omelet!

PJ Brunch for One Menu:

  • Heirloom Cherry Tomato & Basil Egg White Omelet
  • Tomato Basil Butter Crostini
  • Coffee Required

The night before, I was again making butter. This time it was just blending the fresh butter with the DIY Butter Kit’s tomato basil seasoning. I measured out a teaspoon of the seasoning mix and let it soak in ½ teaspoon of warm water as the instructions noted. Then I blended about two tablespoons of the butter using the kit’s spreader. Result: tasty and pretty butter blend.

Homemade Herb and Tomato Butter

Sunday morning and I’m ready for an omelet! I have my Itty Bitty Mixer ready to go along with the Egg Separator also made by Karen & Stephen Steininger.

Egg Separator and Itty Bitty Mixer | UncommonGoods

Ok, so again, I’m not big on the gadgets. When I typically separate egg yolks from whites I just use the egg’s shells, pouring them back and forth until I’m only left with the yolk. Honestly, I usually ruin a fair portion of the eggs when I try this trick. The Egg Separator is ideal, however. The yolk willing hung back while the white slipped right through the gap in the cup. Also, the lip on both the Egg Separator and Itty Bitty Mixer are well-designed for cracking an egg.

Separate eggs easily | Stoneware egg separator

I whipped up airy egg whites in the Itty Bitty mixer and poured them straight into my hot, non-stick skillet. I then added slices of heirloom cherry tomatoes, basil, salt and pepper. While my eggs cooked on medium low heat I toasted my French bread.

Homemade Veggie Omelet

I folded the omelet just to finish it up. Next I put the tomato butter spread on my bread, then plated it all together. Such a happy plate of goodness!

Delicious Brunch

Conclusion:
The tools I used did make for two pretty great brunches. My boyfriend and I got to share brunch, get what we each wanted, and managed to stay away from crowded brunch hot spots. Plus, I had a happy brunch for one the next day. The DIY Butter Kit could be complicated, but does help make some pretty wonderful butter and butter blends. The Itty Bitty Mixer is currently my favorite thing in my kitchen. In fact the design of the mixer and Egg Separator are so nice they’ve both earned a permanent home displayed on my counter.

Recipes:
Apple Sauce Waffles
(Serves 2)
1 ½ cups pancake mix
¾ cup skim milk
1 egg
1 teaspoon vanilla
½ cup chunky apple sauce
½ tablespoon oil (olive oil, vegetable, etc)

In a mixing bowl, whisk together the mix, skim milk, egg, vanilla and oil. Air is your friend. Whisk so mix is smooth without chunks of pancake mix. Whisk in the apple sauce. (You may want to add more milk if the apple sauce does not make the mix into a smooth-pouring batter.)

Turn on your waffle iron to the desired temperature. I crank mine all the way to the “dark” setting for a crispy-on-the-outside waffle. While the waffle iron heats up, your batter needs to rest for a couple of minutes.

Once the waffle iron is at temperature, spray your iron with non-stick spray and slowly pour in your batter. Don’t leave it unattended—the mix might expand. Just open the waffle maker for a second if need be.

Once your waffle is browned and cooked through, pop it out on a plate. Top with happy cinnamon butter and enjoy!

Pumpkin Pancakes
(Serves 2)
1 ½ cups pancake mix
¾ cup skim milk
1 egg
1 teaspoon vanilla
½ cup pumpkin puree
1 teaspoon cinnamon
½ teaspoon nutmeg
(You can most certainly use pumpkin spice instead of mixing your own spices.)

In a mixing bowl, whisk together the mix, skim milk, egg, vanilla and spices. Air is your friend. Whisk so mix is smooth without chunks of pancake mix. Whisk in the pumpkin. (You may want to add more milk if the pumpkin does not make the mix into a smooth-pouring batter.)

While your batter rests for a moment, heat a non-stick pan on medium heat. Just before you pour out your pancakes spray the pan with non-stick spray. When the pancakes begin to bubble and they’re golden brown on the bottom flip them over. Once that side is golden brown remove the pancake. As you plate them top with happy cinnamon butter and enjoy!

Egg White Omelet with Heirloom Cherry Tomatoes and Basil
(Serves 1)
3 egg whites
Olive oil or butter
Heirloom cherry tomatoes (or any tomatoes) thinly sliced
Basil chopped
Salt & Pepper

Heat a non-stick pan over medium low heat. Whisk the eggs whites—air is an omelet’s friend! Don’t let the eggs rest. Go straight from whisking to pouring the eggs into the pan. Season the eggs. As the eggs set gently drag a fork through them so the whites cook. As the omelet is setting, add the tomatoes and basil. Once the omelet has set, with the top still a bit wet, but not runny, fold your omelet. Once heated through plate and serve.

If you have good French bread, toast this up before you start your omelet and use the Butter Kit’s tomato basil butter. Enjoy!

The Uncommon Life

A Taste Test with a Twist

August 22, 2014

Aroma Fork | UncommonGoods

You know how sometimes a smell can make your mouth water? How the scent of cookies baking in the oven or a pot of something yummy simmering on the stove can get your stomach growling? That’s because our senses of taste and smell are closely related.

Intrigued by this connection between how what enters our noses affects what we perceive in our mouths, the makers of one of our best-selling products got to work developing a new product that uses science to enhance the eating experience.

Of course, when we heard about this new good, AromaFork™, we couldn’t wait to try it! So, we rounded up a batch of volunteers from around UncommonGoods and offered them a mid-day snack session in exchange for their honest feedback.

Aroma Fork | UncommonGoods

The blog team asked Data Analytics Manager Victoria, Product Development Associate Tiffany, Senior Operations Manager Mary Catherine, and Digital Marketing Manager Zack to don blindfolds and taste test six different treats. After each nibble, they wrote down not only what they thought the food was based on its taste, but also what they smelled.

Aroma Fork Test | UncommonGoods

No blind taste test is complete without at least a bit of attempted trickery, so we made sure to vary our food and scent combinations to include things we thought would go great together and a few more unusual pairings to try to throw our volunteers off.

We sliced grapefruit and added a drop of mint essence to the AromaFork™’s absorbent scent pad first, but this didn’t fool many of our participants. With the exception of Victoria, who guessed that she was eating a tangerine, the tasting team all called grapefruit. They also all got mint right on the nose.

Aroma Fork Scents | UncommonGoods

Our next edible experiment was with sauerkraut and a whiff of black pepper. This one threw most of the group off. Zack figured it out, but the rest of the bunch was certain it had to be kimchi or some kind of pickled pepper. They had different reactions to the flavor, but they all agreed that the pepper scent seemed to subtly change the perceived flavor of the sauerkraut.

The experiment got off to a good start, but we ended up learning even more as we tested the remaining food/scent combinations. To try a couple of our exclusive aromas, we paired marshmallows with the sweet scent of bubblegum and pound cake with the chocolaty-smelling black forest cake oil. To try something a little different we tried unflavored tofu and a drop of cinnamon scent. To confirm whether or not an added aroma could boost an already strong flavor, we paired Gouda and the smell of smoke. Finally, in one last attempt at fooling our friends, we combined baguette with not one, but two unique smells–olive oil and basil.

Aroma Fork Experiement | UncommonGoodsAroma Fork Guesses | UncommonGoods

As expected, the team’s reactions definitely reflected whether they enjoyed the actual food they were eating. The tofu didn’t go over well, but that seemed to be based on the feel of the food rather than the added scent. Marshmallow, on the other hand, was a success. Even Mary Catherine, who says she doesn’t love marshmallows, enjoyed the combination, calling the experimental version “much more fun.”

Also as expected, the complementary scents we dropped on the forks before serving up the pound cake and Gouda “tricked” our testers into guessing that they were eating more elegant versions of each food. They all guessed “cake” and “cheese” but liked how the scents enhanced the sweet and smokey flavors of their respective foods.

Aroma Fork Test | UncommonGoods

Our final experiment, baguette with a drop of basil scent and a drop of olive oil scent, did confuse the panel. They all knew they were eating bread, but all thought they were either smelling licorice or fennel. (To be fair, we didn’t tell them that they were smelling more than one aroma oil.) From this, we learned that combining a couple of scents can be a fun way to play with the senses, but that the combinations might not turn out as planned.

Trying the Aroma Fork | UncommonGoods

The blind taste test was a blast, we all left our conference room full and content, and we all agreed that the AromaFork™ would be a great dinner party activity. Someone also joked that it could be a clever way to trick your kid into eating veggies!

One of the biggest take-aways from our experimentation is that while the included scents can definitely enhance flavors in food, and even seem to cause subtle changes in flavor, they can’t completely trick you into thinking you’re eating something drastically different than you really are. Of course, we’re open to further testing this theory. Who’s bringing the snacks?!

Gift Guides

Gift Lab: Tea to Go

May 21, 2014

Tea to Go | UncommonGoods

Research:
Do you know that person who wakes up with just enough time to brush, shower, and dress and barely catch the train? Well that’s me. I’m all about getting things to go, in order to save time – typical New Yorker, I know. Hence the reason I chose the Tea to Go for my experiment, figured it would make the difficulties of staying warm on the go, a thing of the past.

Hypothesis:
I am hoping that this keeps my tea warm without burning my hand, as well as keeping it hot for at least an hour. With public transportation being as unpredictable as it is, this would be a big thing for me.

I’m going into this with no knowledge of how the glass apparatus would hold up against the traditional metal thermos that I’m used to. The plan is to use the Tea to Go all the ways that it has been advertised and to see if it meets the needs of someone who’s the definition of a person on the go.

Experiment:
First, I got everything prepared: a kettle of boiling water, 1 peppermint tea for those frigid mornings, 1 peach tea with ice for the playful days, and some loose White Riesling tea for those sleep-in mornings that you can only dream of.

Tea

The body consists of very a thick glass tube and a heavy duty rubber grip. The inner body includes a small perforated section for the tea, then a long portion where the liquid will flow through. I didn’t realize how tall it was until I put it next to my jar of Linguini noodles and, as you can see, it’s right up there.

Tea to Go | UncommonGoods

According to the instructions, I poured the hot water through the small compartment for the tea bag – that was a no go. The water took really long to fill up the tube and I wasn’t about to wait. It made sense if you had to time to allow your tea seep and brew a stronger tea, which wasn’t what I was going for. Instead, I filled up the tube from the larger side and things went smoothly. After letting it sit for 10 minutes, I gave the bottle a slight tilt to allow everything to diffuse evenly and off we go.

Making Tea | UncommonGoodsHot Tea | UncommonGoods

The rubber grip was hotter than I expected, but definitely manageable. After being out of my house for 20 minutes the tea was still extremely hot, and I had to implement the blow-and-sip method, which worked just fine. After being in public transportation for an hour, my tea kept hot (and this is with me keeping the top off so in order to drink). It didn’t really cool down at all, I still had hot tea after an hour and half – that’s a plus.

Loose Leaf Tea

I also gave it a try with loose leaf tea. From looking at the perforations you can tell that large loose tea leaves are the best choice, so that you don’t have leaf residue floating around. I didn’t take that into account until much later. Even though some of the excess tea got in the drinking tube, it was not a big deal. But it’s just something to keep in mind for those who don’t like things floating in their drinks.

The Tea to Go certainly holds up for hot tea 100%. NY Winter – here we come!

Iced Tea to Go | UncommonGoods

Next I gave the bottle a try with iced tea. I let the Peach tea bag seep in a little bit of boiling water before adding filtered water. The water was still relatively warm so I decided to add some ice cubes, which quickly melted but were able to provide me with a cold drink. Took my book, iced tea and an orange and enjoyed the break from freezing temperatures and read for a few on my stoop.

I came back in after an hour with very little tea gone (Harry is just that captivating!), and I was amazed to find out it was still very cold, like a beverage right out the fridge.

Conclusion:
Being a person who lives in New York and has experienced the wonders of Jack Frost first hand, the Tea to Go has become my accessory for those cold rushed mornings. It’s a pretty simple but effective device that will keep my hands and tea warm.

Not only is it good for those frigid mornings we’ve come to love, but it’s versatile enough to keep tea cool for those strolling days. I’m thinking it’s going to come in handy as summer approaches, since it has officially been added to my morning check list – keys, metrocard, money, and Tea to Go.

The Uncommon Life

Gift Lab: Flip & Tumble + Wine Tote + Bentgo: A-leftovering we will go

November 22, 2013

Research

I hate waste. I’m really OCD about it. Disposable shopping bags, takeout containers, and water bottles really bug me. And yet, I do shop, eat on the go, and need H2O. Thus was born my quest for the perfect personal food transport equipment.

3-ItemCollageHypothesis

Our Flip & Tumble Reusable Shopping Bags are light and small and hold a lot. Sounds promising. Our BentGO Lunch Box is good looking. Most of its lunch-toting brethren are decidedly not. It’s also a good size, and except for the lids, microwaveable (for warming up, not cooking), and dishwasher safe. Also promising. Our Wine and Beverage Tote, with its tough canvas outer skin, seems a lot sturdier than fold-up plastic bottles I’ve used before.

Experiment

Step 1: Shopping.

This was mostly accomplished at the Park Slope Food Coop, of which I am an enthused member. A sustainability-minded organization since forever, the coop doesn’t give out shopping bags. Flip & Tumbles are perfect for shopping there. They weigh virtually nothing, open up in a jiffy (faster and easier than any shopping bag I’ve ever used), hold a lot, and are strong and sturdy. The even have a non-slip patch on the inside top of the shoulder strap.

Giftlab food-bags 016-CROPPED

Here’s how they look full of groceries.

Giftlab food-bags 019-CROPPED

Here are most of the ingredients, spread out. (The bags actually held a lot more than this.)

Step 2: Cooking.

I bought a spaetzle maker no less than 6 years ago, and until now, had never used it. Sound familiar, gadget lovers? I saw this recipe in the New York Times, and knew this was what would make spaetzle happen in my kitchen.

To round out the meal, I decided to make mashed sweet potatoes with lime and honey (the recipe calls them yams, but they are NOT; shame on you, Saveur!) with broiled grapefruit for dessert.

11-18-13UG-giftlab-cooking 004-CROPPED

I put the sweet potatoes in a casserole dish and stuck them in the preheated 350 degree oven.

I then sliced the leeks and cabbage (separately) very thinly in the food processor. I melted a bunch of butter in a big frying pan and sauteed the leeks. But I forgot to take photos of all that, so you’ll have to use your imagination.

CabbageCookingCollage

The savoy cabbage, sauteeing on top of the already-sauteed leeks.

11-18-13UG-giftlab-cooking 021

Above is the mixed white all-purpose, whole wheat, and whole rye flour (yes, I ground it from the berries, here’s why), to which I added an egg and whole milk. It’s supposed to end up like cake batter, not bread dough, so you keep adding milk until it feels right. Because I used whole wheat flour, which the recipe doesn’t call for, I used more milk than recommended, because whole wheat flour absorbs more liquid.

11-18-13UG-giftlab-cooking 001

My spaetzle maker in action, at long last. You pour the batter gradually into the white hopper which you then slide along the holey stainless steel part that’s straddling the pot of boiling, salted water. The dough slips through randomly, drops into the pot, and cooks very quickly, rising to the top.

11-18-13UG-giftlab-cooking 022

It’s pasta…it’s dumplings….it’s spaetzle!

11-18-13UG-giftlab-cooking 027-CROPPED

11-18-13UG-giftlab-cooking 017

The recipe calls for thyme, which I conveniently have growing in one of my kitchen windowboxes.

Now it’s time for it to be topped with grated Gruyere cheese, put in a casserole dish, and baked. But wait–where’s that dish?!

11-18-13UG-giftlab-cooking 044

Oh yeah, it was baking these. When I took them out, I didn’t bother cleaning it, because sugary, gooey sweet potato ooze can only improve a dish. I did mix it in, though, so it wouldn’t just burn on the bottom.

11-18-13UG-giftlab-cooking 032-CROPPED

The casserole in a state of baking readiness.

11-18-13UG-giftlab-cooking 045-CROPPED

The sweet potatoes, mashed with a fork and mingling with their new BFFs: butter, fresh lime juice, and honey.

11-18-13UG-giftlab-cooking 051-CROPPED

20 minutes after being put into the 425 degree oven: Done.

11-19-13UG-giftlab-cooking 018-CROPPED

Now for the broiled grapefruit. Easiest thing ever: cut in half, top with brown sugar (or not), turn broiler on, pop in citrus.

~An interlude, during which I eat this delicious dinner, and sleep. A new day dawns.~

11-19-13UG-giftlab-cooking 025-CROPPED

The true and ultimate destiny of this food, of course, was being consumed as leftovers. I added some homemade kefir I put into a can that I’d fished out from the recycling and washed (see above re: “OCD about waste;” also, it was the perfect size), because I thought it would go well with both the casserole and the grapefruit.

11-19-13UG-giftlab-cooking 038

Stick a fork in it–it’s done.

Step 3: A) Eating and B) Drinking

A) The spaetzle dish, like most casseroles, was even better the next day. It nuked up beautifully in its spiffy BentGO container. I ate it in about two minutes flat. No, I will not show you what that looked like. My mother might be reading this, and it would make her cry to see that all those years of table manners lessons were wasted on me.

UG giftlab-wine tote 004-CROPPED

B) The Wine and Beverage Tote, alas, was filled only with water, because I was at work. (You think I can write all juiced up? No. I leave that to pros.) For purely scientific purposes, I did fill it with wine the night before. Miraculously, it holds an entire, normal-sized bottle, though you have to make sure the bag is poufed out all the way while (carefully) pouring. I recommend red wine, because the Tote isn’t insulated, so the wine will be at room temperature before long.

I really appreciated its sturdy canvas exterior, because it freed me from the nagging worry that something sharp in my bag might gouge it. If there’d been red wine inside, I would have appreciated it even more–no, not because of the alcohol; because of the potential for mess. (OK, the alcohol, too.) Note that I swapped out the original petite black carabiner with a larger one of my own, partly–but ONLY partly, I swear–because mine is pink.

Recipe links:
New York Times: Rye spaetzle gratin with savoy cabbage, leeks and caraway
Saveur: Mashed sweet potatoes with lime and honey
TheKitchn: Sweet and smoky broiled grapefruit

Gift Guides

Gift Lab: How to Make Grilled Cheese (in the Toaster!)

November 15, 2013

Anna Moreno | UncommonGoods

Research
I love a good grilled cheese. The gooey goodness inside reminds me of childhood meals, always paired with a tomato soup, of course. I first saw the Toaster Grilled Cheese Bags and thought it would be a fun, and super easy, way to make that delicious, buttery comfort food. I’d never heard of such a product before. How simple – just put it in a toaster! I’m, however, familiar with the iron-grilled cheese approach…enough said. In comparison, that ironing approach is quite barbaric.

Hypothesis
Given my experience with toast and grilled cheese, I suspect that the sandwiches will be nice and melt-y. However, the warm buttery flavor (that is signature to anything cooked with butter on a frying pan) will be missing.

Experiment
Step 1: Checking out the goods
The Toaster Grilled Cheese Bags are very different than I expected. They’re a silky-papery material. Very tough and pliable. So far, I’m impressed. Three bags are included in the package (wish it was four for those 4 slotted toasters). The grilled cheese in the picture looks really delicious – nice and golden.

Make grilled cheese in your toaster!
Toaster Grilled Cheese Bags | UncommonGoods

The Ooma Bowl
I love the clean and colorful look. It’s meant to easily fit into the hand for holding. Overall, the style gets two thumbs up from me. The bowl may also serve as a nice pet food dish? Food on the left, water on the right.

Ooma Bowl | UncommonGoods

Step 2: Assemble the ingredients
For my experiment I’m making 2 recipes.

First: The Classic. Simple and to the point; white bread, sharp cheddar.

Making Grilled Cheese

Second: Italian Craving–Featuring the Ooma Bowl. Yummy take on the classic done Italian style. My plan is to cut the finished sandwiches into sticks and use to use the Ooma Bowl for easy dipping. Using mozzarella, pesto spread, fresh basil, and sundried tomatoes. For the dipping sauce I’m using my favorite marinara Rao’s Homemade (it’s the best; I highly recommend trying it).

Italian Grilled Cheese

Step 3: Get’m grilled
Attempt Number One:
The Classic. It was pretty simple to get them into the bags. It needed a little maneuvering, but nothing difficult. I have a nice toaster that accommodates bagels. After getting them bagged I put them in, I set the toaster to level 4 and set it into motion.

Easy Toaster Grilled Cheese | UncommonGoods

The end result was not what I was hoping for. Setting 4 didn’t cut it. The cheese didn’t melt, and the bread was not toasted enough. Compared to the picture on the packaging, my sandwich was a total fail. Try again…

Sandwich

Attempt Number Two:
OK, the setting was too low; I overcompensated by upping the game to a level six setting. Also, I was thinking I would try to add some butter to the bread in hopes of obtaining that nice golden buttery glow. I melted 2 tablespoons and brushed the outsides of the bread with a pastry brush. Drum roll please…

I got the taste spot on and beautiful melted cheese. However, I ended up with burnt bread. It didn’t taste bad, but charred is no good either. Also, the butter made the bags all greasy.

grilled cheese

Toaster Grilled Cheese | UncommonGoods

Attempt Number Three:
I completed my attempts with the Classic recipe and moved onto the Italian Craving. First things first, I washed the bags. They got greasy from the butter and the melted cheese. Washing was incredibly easy. I used a simple sponge with handle and hot water. I hand dried, but noticed that the bags held moisture. I didn’t have time to let them air dry, so I continued on with the sandwich making.

I made a total of 4 sandwiches; all of which came out a little darker than I expected. I’m not sure what’s to blame. My toaster setting, the moist bags, the butter; I really am not sure. What I do know is that the sandwiches were tasty. (The chef has to taste their food before it leaves the kitchen).

Italian Grilled Cheese | UncommonGoods

Step 4: Plate and Taste
Time to eat, drink, and be merry. As planned, I cut the grilled cheese into long strips and placed them into the Ooma Bowl. I heated the sauce and added that to the smaller section. Et voila! A culinary masterpiece. (At least for moi, a simple cook.)

Grilled Cheese Fingers with Tomato Sauce

The bowl was easy to hold. Modeled by my fiancé (thank you for your help). Recommended for couch activities such as Sunday sports and Netflix. A delicious end to a full day of ingredient shopping and toaster cooking.

Grilled Cheese Dunk
Noah

Conclusion
Did these match up to the classic grilled cheese? Not completely; however, they were 1. Easy to make and 2. Melt-y and tasty.

Lessons Learned:
1. Don’t apply butter before toasting! It may be good to apply after? Question for thought.
2. The bags need to thoroughly dry before the next use. I later washed, hand dried, and placed on the handle of a frying pan to dry.
3. Toaster settings are key; you need to find the right one. (I have yet to find the right one for my toaster.)

Photo Credit: Moi! Anna Moreno
Model: My fiancé Noah Perkins

Gift Guides

Gift Lab: How to Make Music by Playing Wine Glasses

September 27, 2013

Major Scale Musical Wine Glasses | UncommonGoods

Research
As a developer of the Major Scale Musical Wine Glasses®, my knowledge of the product is quite comprehensive, but this was my first chance to test a random unit straight off the production floor. In developing these musical glasses, we looked for a glass that would allow for a full A major scale, allowing for more versatile music-making. We used a high-quality lead-free crystal glass here to ensure the best resonance we could achieve.

I’m not a big wine drinker, but you’ll find me sneaking a swig of water every now and again – so I’m conducting this experiment with water as an alternative. I try to keep practice on my violin, but I’m much more likely to produce something resembling music with my finger on these glasses than with my bow on strings – so I’m looking forward to the chance to actually hit the right notes for a change.

Musical Wine Glass Packaging | Uncommon Goods

Hypothesis
Due to variations in glass we knew absolute, orchestral perfection was a bit too aspirational, but we have been pleased to find that the fill lines correspond quite nicely to the note indicated. My hypothesis is that I’ll have a pretty happy match today.

Experiment
Fill ‘er up! I poured to the first note – an ‘A,’ moistened my finger in another glass to allow for smooth movement around the rim, and round my finger went firmly in a circular motion. As I draw my finger around the rim, the alternating slipping and sticking creates a vibration pattern in the glass. The speed of vibration, meanwhile, is affected by the volume of liquid in the glass, and different vibrations will produce different notes. The results of my first attempt?

Playing Music on Wine Glasses

A lovely ‘A’ note resonates through the dining room, accompanied by a hypnotic ripple along the surface of the wine. As you can see…a successful ‘A’!

'A' Note

I toast to a successful first pour and continue on my journey through the A Major scale.

I poured a taller glass and around I went again.

Major Scale Musical Wine Glass | UncommonGoods

Crosschecking with another tuner – a direct hit! SuccEss with a capital ‘E’.

'E' NoteConclusion

Though slight variations in glass will yield somewhat different performance, a random test proved more than satisfactory to my unprofessional, yet music-appreciating ears. Very content and ready to wet my whistle, I toast to beautiful music with my fiancée and Franklin Broccoli, our almost-real pet bulldog.

Musical Wine Glass Toast

To see and hear these uncommon instruments make music with your own eyes and ears, check out this video of me playing Vivaldi’s Four Seasons.